Van Conversion (VW T4)
About the project
About the VW T4
Many years ago my family bought a Volkswagen T4 Mulitivan.
A beautiful car for everyone, it is spacious, classic and allows to carry larger goods or an entire family. The best about it especially for the younger generations is the ability to sleep in it, making it a vehicle of pure freedom radiating the desires of youthfulness.
There was only one problem: The ticking clock of time.
According to wikipedia on car longevity (link here), a car up to the 70s reached its end of life around 160.000km and nowadays it is somewhere around 300.000km.
The VW T4 was produced between 1990 and 2004. Meaning all T4s are basically older than 20 or 30 years. According to this study (link here) the average age expectancy of a car in Europe is somewhere around 8.0 to 35.1 years.
Our VW T4 had now 350.000km and an age of 25 years. Basically it was at the relative end of the expected distance a car could drive and the age it would reach. And one could see the bite of time on our beloved T4 Multivan. My parents suggested to sell it for a little amount and to get something newer.
Up until this point I have never put hands on the mechanics on a car and this opportunity was just too good to be true:
It was time to make an old VW van into a beautiful, good-looking camper!
My recommendation:
If you do not have all the tools needed to build your own camper, you can search for rentable workshops in your area. For an hourly/daily fee, you can use all the tools, and even their lifting platform. This is exactly what I did in this project! I did as much as I could in the parking lot around our house, but for some works, I rented a workshop.
2. Start of the Conversion
Let's take a look at the Volkswagen T4 on the day the project started. We can't really see behind all the interior panels that cover the car's body. And there's a good reason for that – who wants to see the bare metal chassis? On second thought, I do. A more raw-looking car would be somewhat exciting, but let's stick to the topic. Since we can't peer behind the interior panels, we also don't know the condition of the metal parts underneath. Over the years, for reasons like hardened door seals or other age-related issues, water finds an easier path into the vehicle. It doesn't even have to reach behind the panels; it's already enough to frequently raise humidity levels, thus creating an environment conducive to oxidation. And the result is the biggest car killer out there: rust.
To keep this brief, I was pretty confident that the condition beneath the panels would be fairly good.
Now, let's remove as much of the interior as possible and see what more than 25 years and 350,000 km have done to the body chassis.
My Recommendation:
If you're starting a camper conversion on a second-hand vehicle, I advise removing as many panels as possible to check and address any rust before it becomes a major issue. Remember, once you've installed your camper interior, the last thing you'll want to do is dismantle it to deal with rust. By ensuring the body chassis is in good condition from the start, you not only enjoy your DIY project for longer, but you also help maintain the vehicle's value, as a well-cared-for camper is less prone to depreciation. Most owners overlook rust treatment and prevention, so this step can really make a difference.
3. A Closer Look: Behind the Paneling
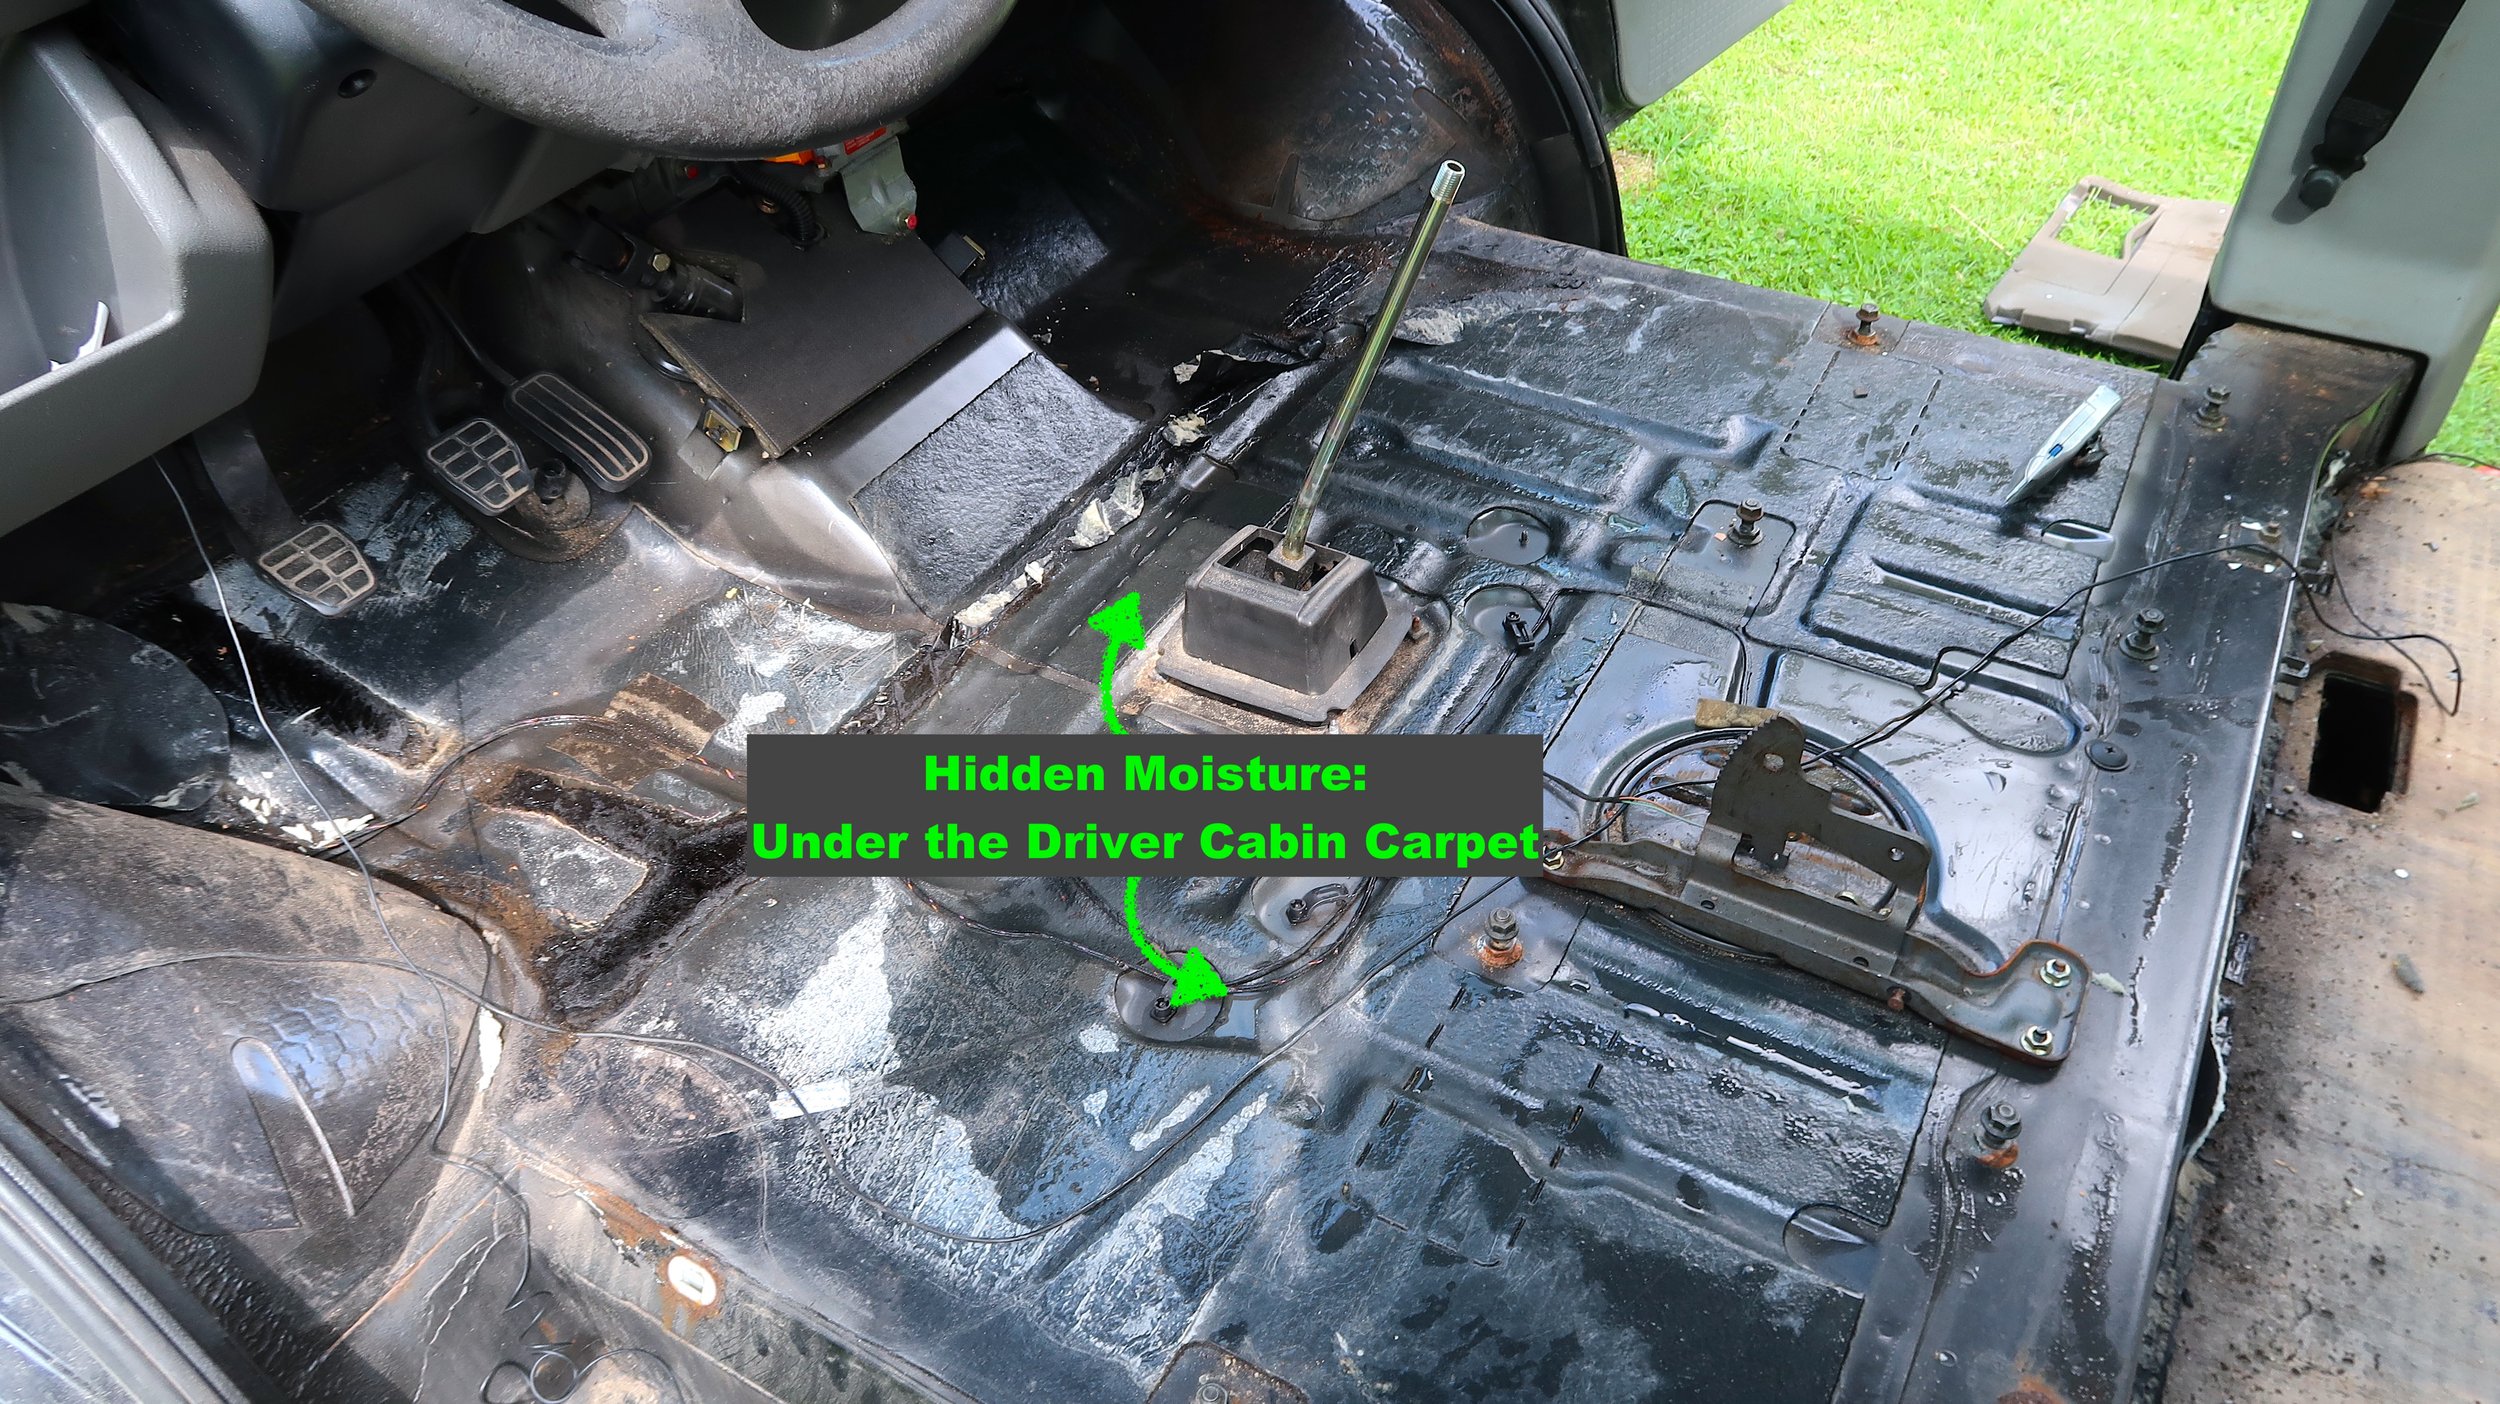
Removing the side panels did not unveil anything unexpected – just some slight oxidation and a rusty wheel housing, which is quite normal for an old VW Bus. But when I took out the carpet in the driver's cabin and the floor plate, I discovered how water had, unknown to me, seeped into the driver's cabin and under the carpet, creating a persistently humid environment that extended under the floor plate.
This resulted in mold formation at the beginning of the floor plate. Additionally, the floor chassis was in worse condition than I had anticipated. I removed as much loose rust as possible, which revealed quite a few holes.
And as you might guess, that was when I realized this conversion was going to take longer than I had hoped. But there was no time for burying my head in the sand; it was time to cut out as much of the rusted metal as possible and weld in new metal sheets. And that's exactly what I did. I rented a local lift and a welding machine, and started welding.
My Recommendation:
As I mentioned in my conversion book, particularly in the chapter "Buying a Second-Hand Car: Tips for a Successful Purchase", it's wise to look for common areas prone to water leaks when examining a second-hand car. As shown here, significant issues can go undetected, potentially leading to considerable costs to fix before even starting your DIY camper project. Be sure to inspect the vehicle thoroughly before signing the purchase contract, and do yourself a favour by investing in a professional check-up. This extra investment can save you weeks or even months of headaches later on!
4. Rust Reveal & Welding Results
The welding of all the rust holes took me around three days, as I also had to shape a metal sheet for the wheel housing, which was quite a difficult task due to the tight spaces.
After welding, I treated the floor with high-quality paint followed by a coat of a rubber and resin mixture commonly known as 'underbody coating'. This step helped me create a vibration-resistant surface (click).
Take a look at how the once-rusty VW T4 now shines as if it were new.
My Recommendation:
Spend a few more euros and start with a rust-free or relatively rust-free vehicle for your conversion. Treating surface rust isn't difficult, but if you're dealing with rust holes, the costs can escalate quickly, especially if you need to pay a car body shop to fix them. It only makes sense to do the welding yourself; otherwise, it's much more cost-effective to invest a bit more upfront and start with a better base vehicle. Also, consider your time and energy: the more time you spend on the conversion, the less you have for other productive activities and, likely, the less time you'll have to enjoy the finished camper.
5. Insulation & Floor plate
If you intend to use your camper during colder times, I suggest applying some sort of insulation. There are different types of insulation, but not all are suitable for campers.
In my conversion book, "How to Build a Mini-Camper" (click) I detail what I have found to be the most suitable solution. It is a self-adhesive, high-quality insulation material that is flame retardant, provides less condensation, and much more. Here are two great options for camper insulation in that category:
For me, the noise reduction is just as satisfying as the better heating efficiency. Being inside the car, even without an engine running, feels so much more comfortable. Also, driving has become so much more relaxing as the street noise is not as loud, and the tinny metal sounds have mostly vanished. The closing of doors feels like one has bulletproof doors as they close with such a deeper sound because the metal does not vibrate.
Tip: Using slats between the insulation allows for a stable, yet easily applied foundation. It's best to glue the slats to the body chassis. The same applies to the floor base structure.
My Recommendation:
Don't just think of increased heating efficiency; good insulation can offer so much more. A step-by-step insulation installation guide is included in the conversion book (click). In the book you can also find the ideal floor plate material.
6. Vinyl Flooring & Drawer Base
The floor plate does not look particularly beautiful, therefore covering the floor with vinyl is a good choice. However, be sure to choose a vinyl material that can resist higher temperatures without deforming itself. On a hot summer day, the interior temperature can easily exceed 60°C.
For the drawers, I ordered heavy-duty telescopic rails from this online shop (click). I use only telescopic rails from this particular online shop as they are the most solid and durable and of high quality while being very affordable. The option of choosing such sliding rails with an integrated locking mechanism makes installation so much easier. Simply screw them to your interior and you don't have to worry about any drawers opening by themselves during hard braking. It's super convenient.
I welded a metal frame (drawer base) out of regular metal pipes (square tubing). I then drilled holes into it and used the original anchoring points for the large Multivan seat bench/bed to secure the drawer base. This also allowed the floor plate and vinyl to be safely secured to the body chassis. I am sure nothing moves anymore.
To make it much easier, the company of the telescopic rails now also offers mounting brackets, so you can simply choose the telescopic rail you need and you will find an additional add-on the suitable mounting bracket (click). Then simply screw the mounting bracket to the floor and the telescopic rail, done.
Then it was time to build the drawers for the telescopic rails.
My Recommendation:
Using high-quality telescopic rails will save you many headaches as you don't want to have a broken sliding drawer during a trip. The company I ordered from has been proven to deliver top quality for a good price (click). You can simply skip welding a drawer base like I did and simply add some mounting brackets to your order of telescopic rails (click).
7. Camper Interior & Water System
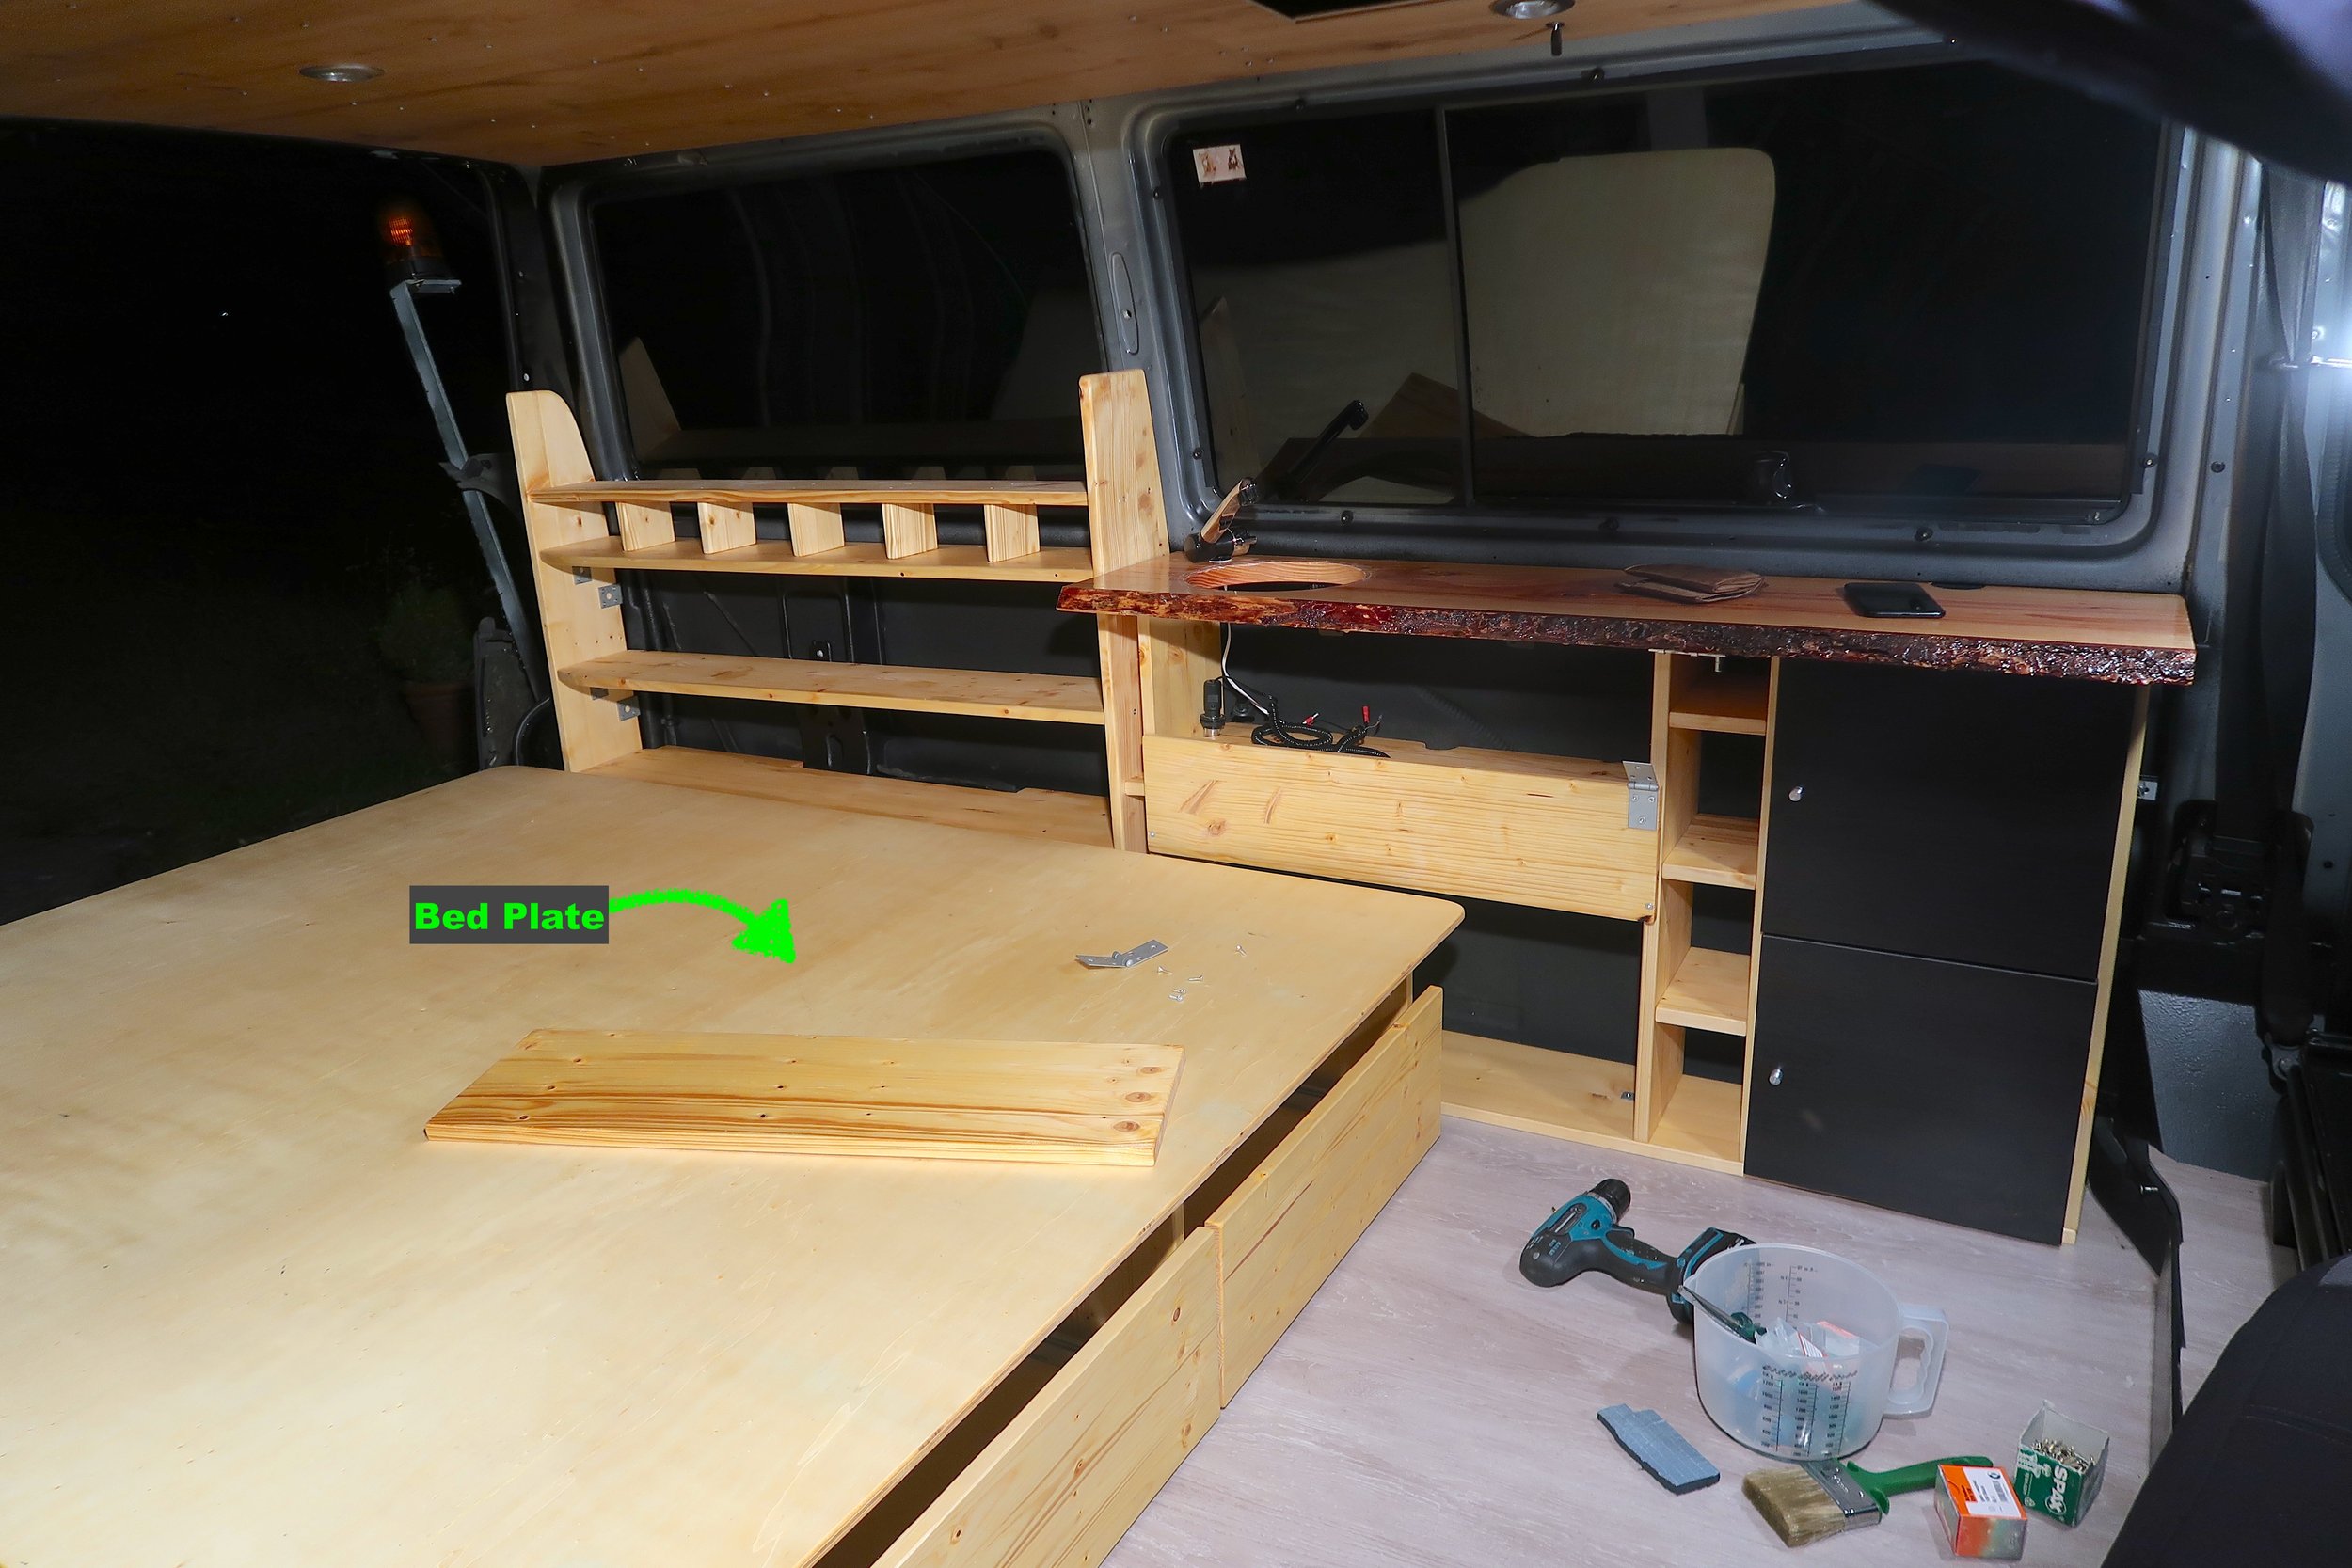
The VW T4 still falls into the category of 'Mini-Camper' and therefore won’t leave much space for furniture building. However, there is still space along the walls on the driver's side. For more ideas and inspiration, check out the @MiniCamperCommunity Instagram page that I created (click).
It turns out there is enough space to build a kitchen, including water tanks and storage units.
Everything below the bed plate will be used for the sliding drawers.
The kitchen table was chosen to be natural wood cut and then coated with epoxy to give it a strong and water-resistant finish. This prevents any water-related damages or mold growth from the sink and water pipes.
The water system comes as a unit including the sink. The tap has a built-in button and when turned, it activates the also included water pump. This means simply plug this all-in-one water kit into a 12V outlet and drop the water pump into the fresh water tank. Now the pump transports water to the tap, how wonderful running water in the T4 camper.
My Recommendation:
Don’t overcomplicate the furniture building. Even recycled wood can work wonders here; give it a good sanding and some fresh paint, and it will incorporate wonderfully. It is important to treat all wood surfaces as a camper will be exposed to high humidity levels for prolonged periods.
8. Bed Plate
The bed plate is chosen to be thin and lightweight while providing enough strength to comfortably carry two people. All space below the plate will be utilized for four large sliding drawers. This eliminates the need for body-contorting efforts to reach any item beneath the bed.
After many years of using DIY campers as daily commuters, I can assure you that one of my favorite features is being able to access every inch under the bed with ease. Simply pull out the drawer, and everything is exposed.
Tip #1: Opt for a bed plate instead of a slatted bed frame. The plate can be thinner, saving some centimeters in volume. If you're concerned about airflow to the mattress, just drill some holes in the bed plate to improve the mattress's breathability.
Tip #2: Find a good balance between the height of your drawers and the space above the bed plate. Overly high drawers can make the interior feel less cozy, as you might feel confined lying in bed. I made the drawers slightly less tall than I initially wanted, which proved ideal as I never managed to fill them completely for our trips, allowing for a comfortable sleeping and resting experience inside the mini-camper VW T4.
My Recommendation:
A bed plate instead of a slatted bed frame allows for more usable space inside your mini-camper. We also use a bed cover that reduces the amount of body transpiration entering the mattress, decreasing the risk of humidity-related issues inside or around the mattress. Here is such an option (click). Alternatively, you can find such a mattress protector at IKEA. For detailed bed plate installation guidance, see my conversion book (click).
9. Final Results
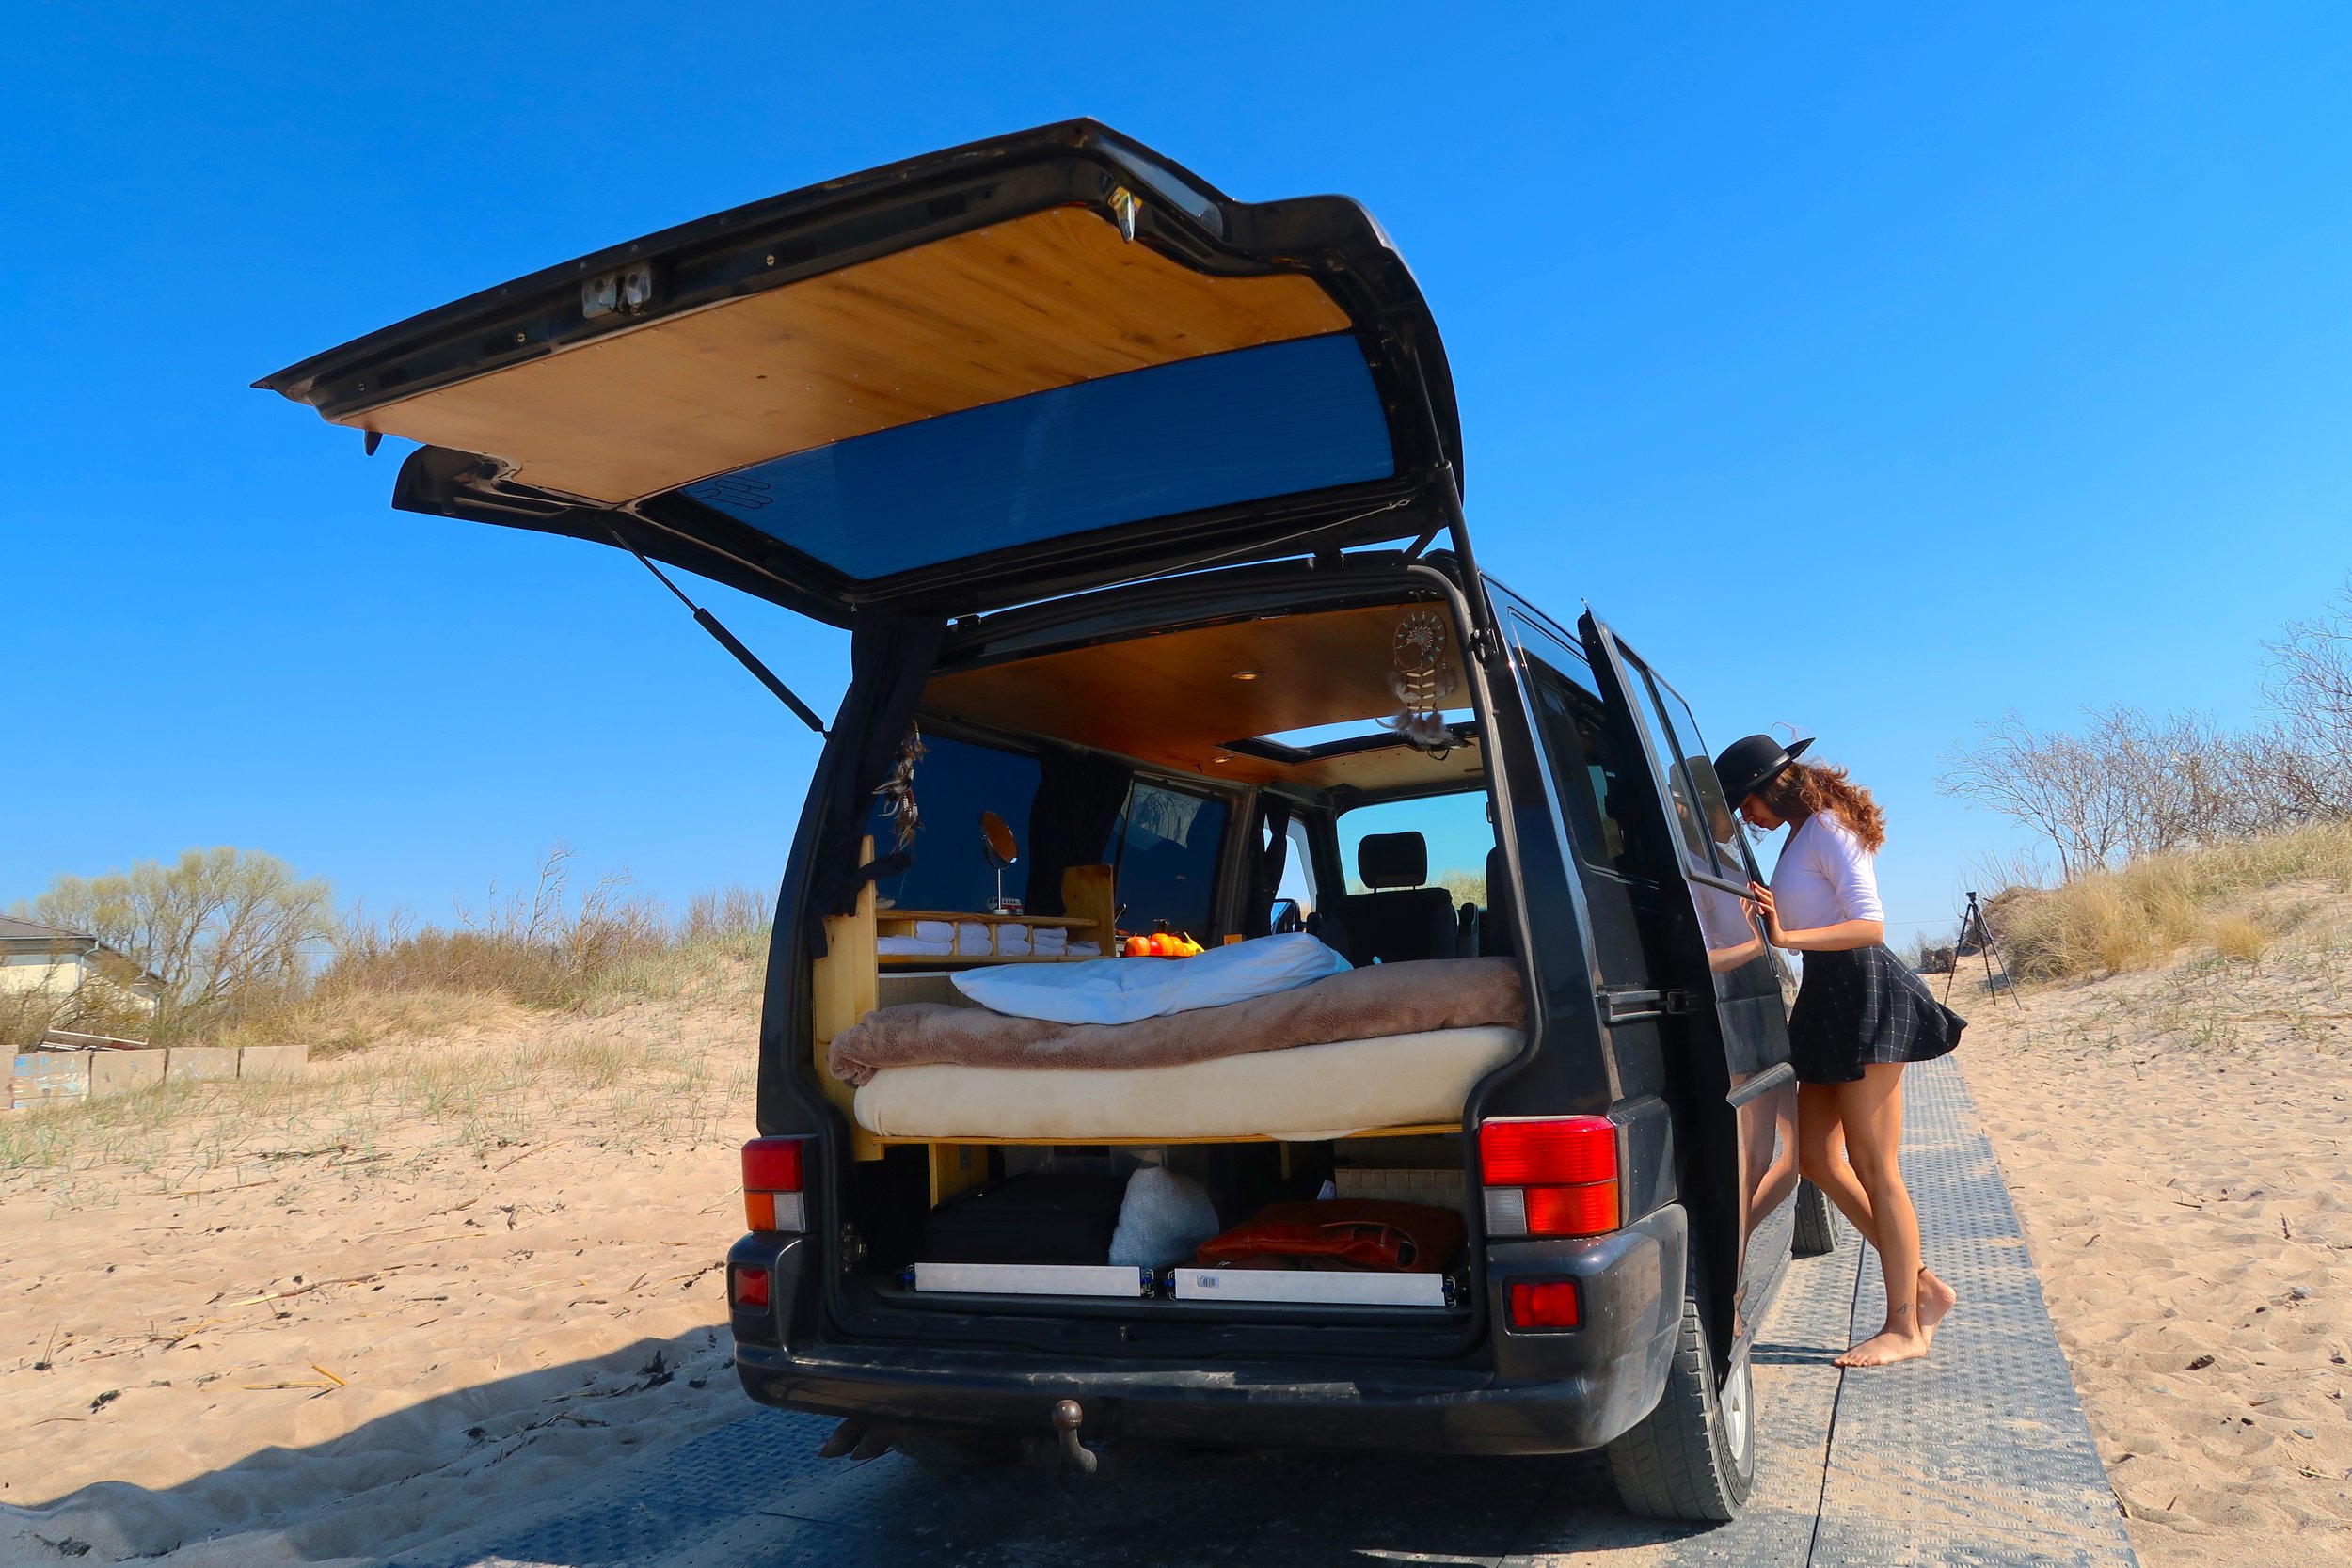
Time to look at the completed conversion. In total, this conversion cost me less than 1000€. However, bear in mind that I did the welding and bending of the metal myself to repair all rust damage. Since my own time didn't cost me anything, I didn't include it in the cost, but if done at a car body shop, just the rust treatment and welding could have easily cost 3000€, if not more. This again highlights the importance of using a vehicle that is not rust-infested.
My Recommendation:
Start with a relatively or completely rust-free vehicle for your DIY camper project. In my conversion book (click), I provide some tips to ensure a successful second-hand car purchase and guidance on rust-prevention techniques. A close friend of mine made the mistake of not checking the second-hand van he bought for his camper project properly, which left him in a 2-year dispute involving a lawyer, all leaving him discouraged and without a camper. I cannot stress enough, please make sure to follow my guidance on how to find a suitable second-hand vehicle in my conversion book. Adding a professional inspection on top might cost you around 100€ but can save you so much energy, and starting on the right foot is so important!
Bonus: Winter Camping
Here's a quick glimpse into the beauty of using a camper during the winter months. Keep in mind that I have not installed a parking heater in this VW T4 mini-camper. We use the campfire for warmth and have plenty of warm blankets. At night, the three of us (Bella, myself, and our dog) snuggle under all the blankets, which generates sufficient heat. The coldest we've slept was at minus 10 degrees Celsius, but that was the absolute limit, as the sleep was hardly comfortable, yet it was possible. This experience underscored the importance of a parking heater, and since then, I've never completed a DIY camper without installing a 2kW parking heater.
If you're interested in seeing the installation of a parking heater, be sure to check out the following conversions:
The VW Caddy mini-camper conversion (click here)
The Fiat Ducato camper conversion (click here)
My Recommendation:
Being able to use the camper year-round is invaluable, and remember that the cost of installing a parking heater is about equivalent to the increase in the vehicle's value after installation. Therefore, in my opinion, it's a no-brainer.
More in the Conversion Video & Book
To avoid making this page excessively long by listing every step, I’d like to invite you to view the conversion video of the T4 camper conversion. I recorded the footage during the conversion and crafted it into a video.
The video is available in three languages, which you can access through the clickable buttons at the top of this page. This VW T4 was my first conversion and dates back several years, so I'm not entirely satisfied with how I filmed this project. Please understand that these were also among the first videos I created. The quality of my subsequent Fiat Ducato and VW Caddy videos has significantly improved.
If you’re looking for an in-depth, step-by-step guide, take a look at my conversion book “How to Build a Mini-Camper.” I spent almost a year gathering the most important information for this book, which can help you achieve your DIY camper dream more quickly. Research is often the most time-consuming aspect of camper conversion. You can find the book by clicking here (click).


