Van Conversion (VW T5)
Inside the Project
About the VW T5
Our firstborn arrived in 2023. Prior to this, we drove the VW Caddy mini camper (see the mini camper project here). However, the mini camper had only two seats in the driver's cabin, with the rest optimized for living and sleeping. This meant we needed a larger, family-friendly vehicle, but camping remained a significant passion for us. Since we use our DIY campers as our daily commuters, it needed to drive like a regular vehicle, yet offer enough space for a fully-equipped camper. It also had to have enough seats to accommodate both me and my partner, a child, and occasionally some grandparents and friends. Additionally, it needed to fit a stroller.
We don't like rearranging things to access the camping area inside. We want everything to be as accessible without any extra effort. My partner isn't fond of driving vehicles the size of a Fiat Ducato (click). It needed to be something in between a Ducato and our previously owned VW T4 (click), which served us as a low-budget DIY camper for almost a decade.
After conducting some research and measuring parked cars in various parking lots, I believed I had found the perfect middle ground for a family-friendly vehicle: The Volkswagen T5 (L2 Caravelle).
The next step was to research second-hand vehicles and check daily for new listings of people wanting to sell their previously owned T5. You can find more in-depth details in the chapter “Buying a Second-Hand Car” in my "Camper Conversion Book" (click here).
My Recommendation:
When choosing a second-hand car, it's wise not to rush into purchasing the first vehicle you see listed. Some unfavourable offers often remain online for weeks or even months. So, when you're looking for a second-hand vehicle, don't assume you've immediately found a great deal on your first check. It usually takes multiple visits and a few weeks to find a good deal on a used car.
2. T5 (L2) vs. Caddy (L1) vs. Ducato (L2)
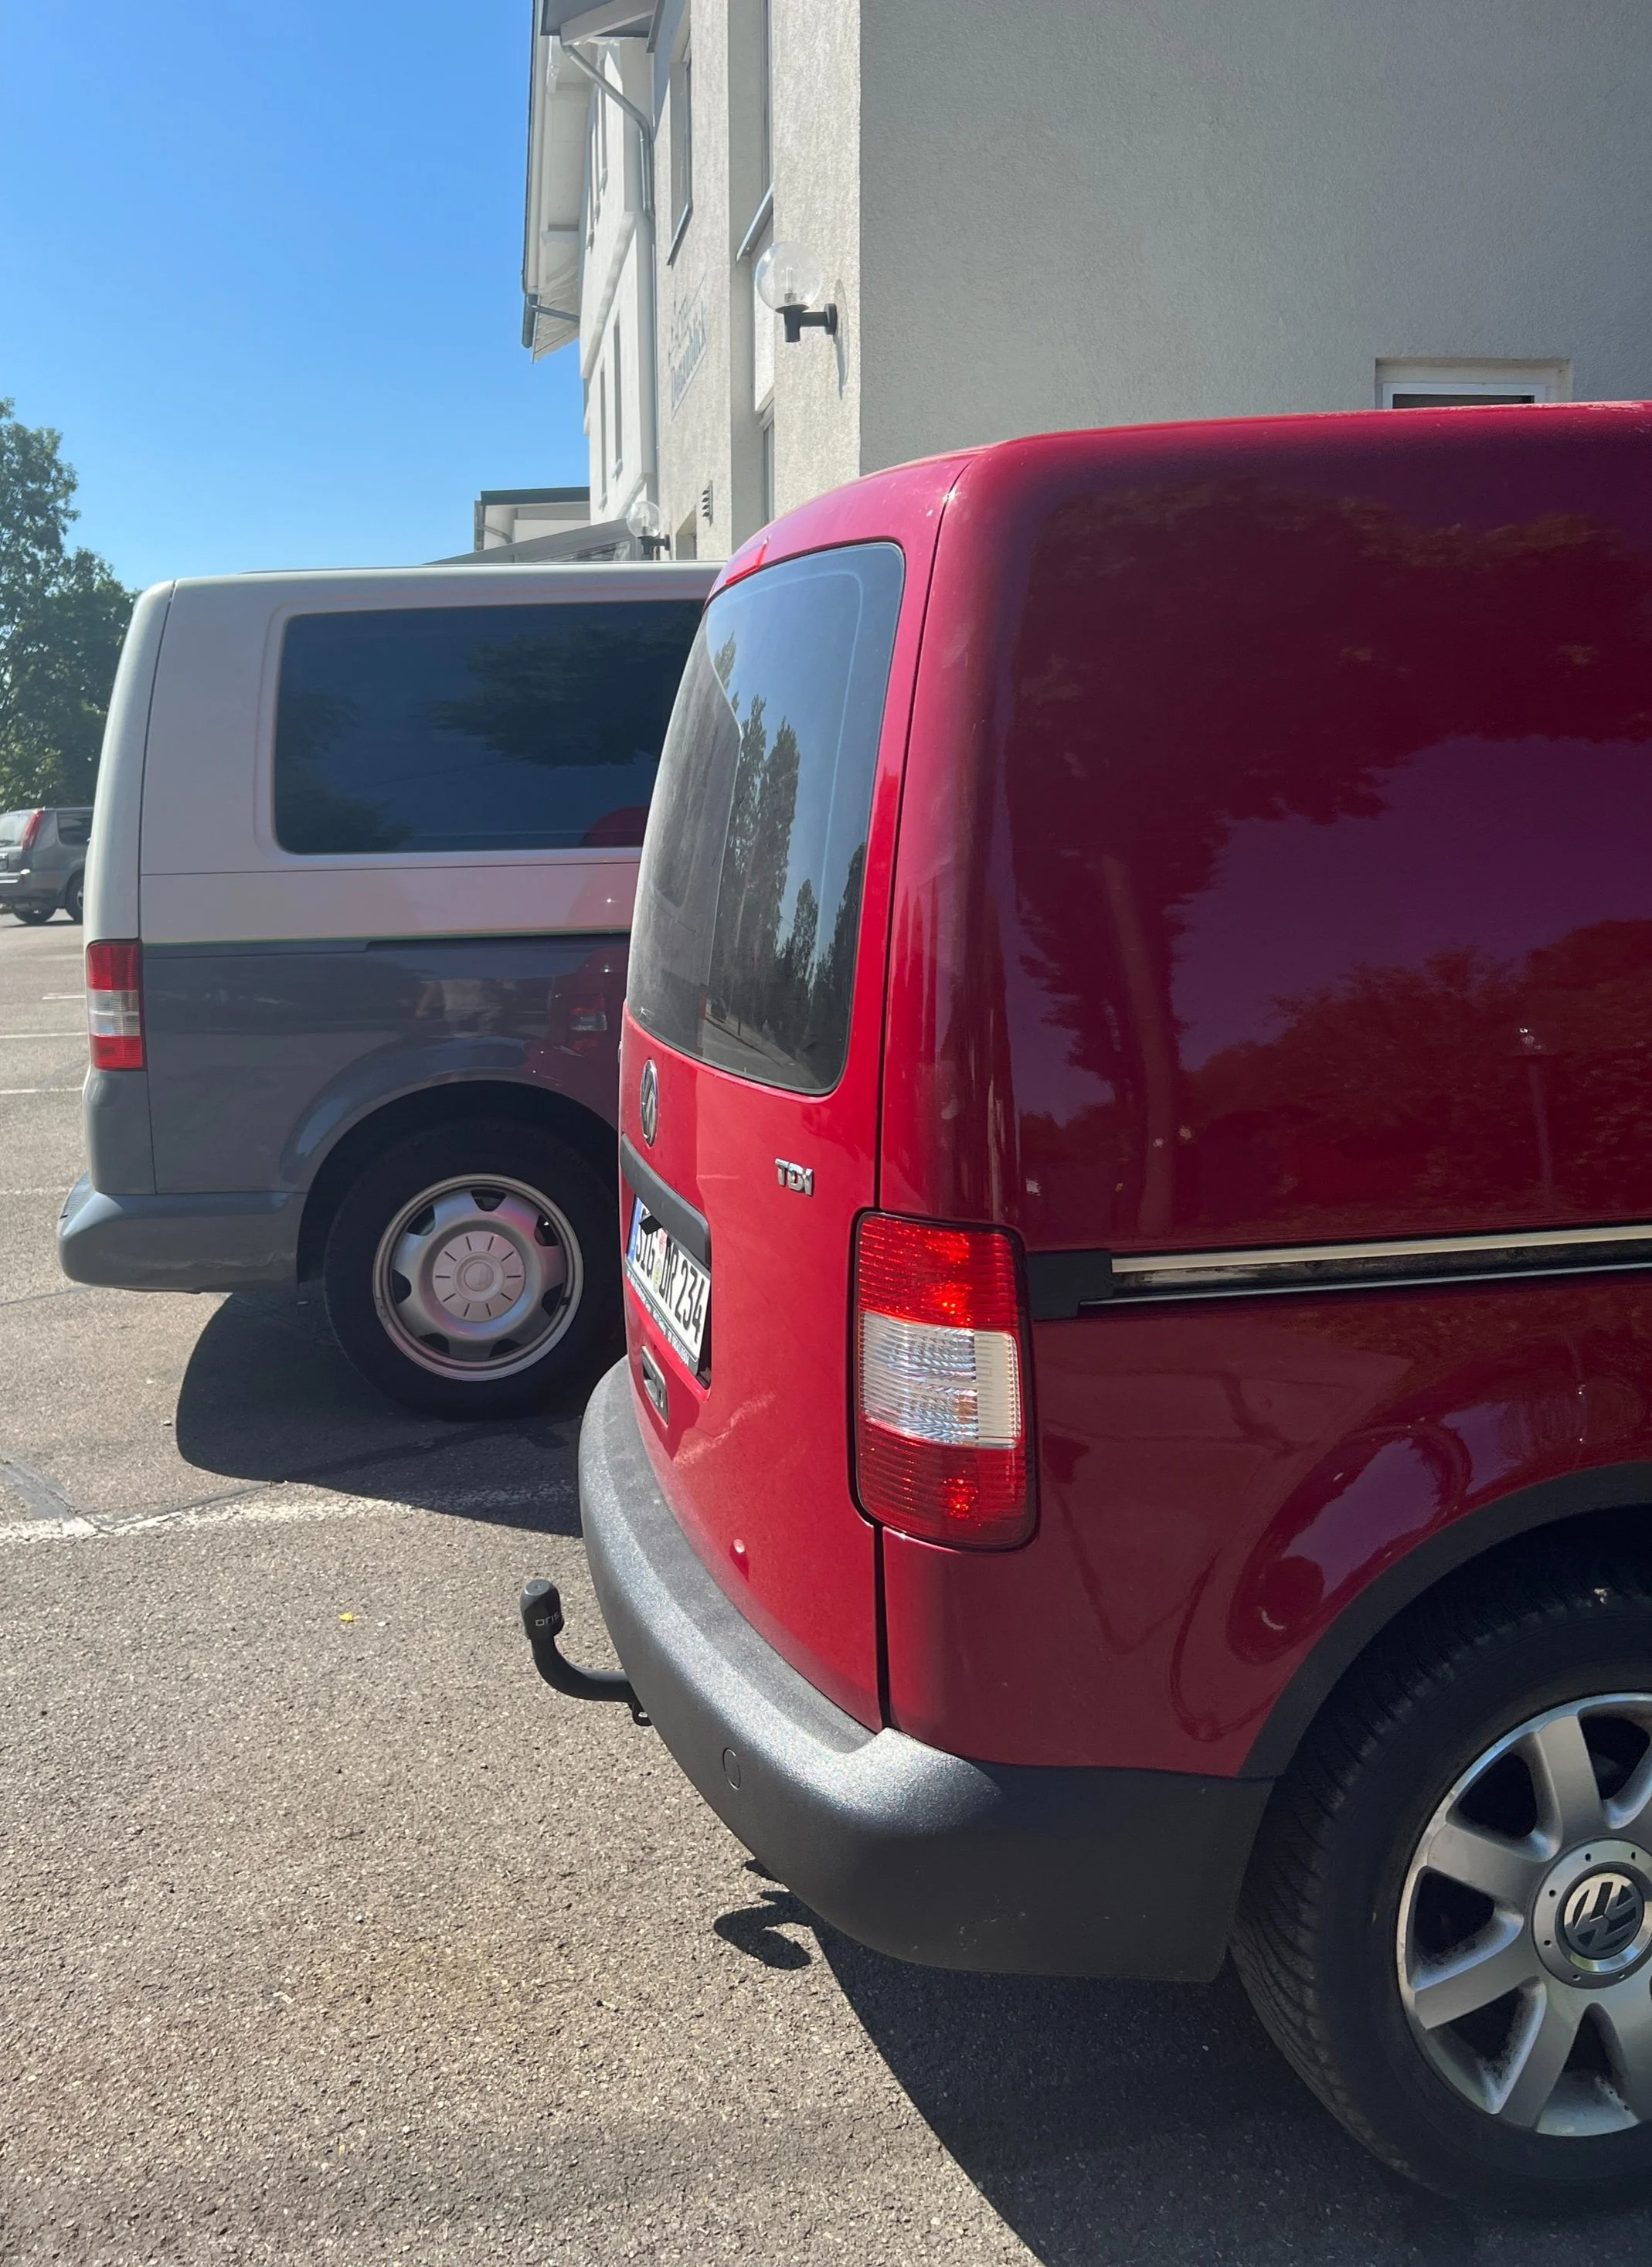
To better understand the size difference between our previous mini-camper and the VW T5, I parked them side by side. It's evident that the VW T5 is larger in every dimension, but what stands out the most is its increased length compared to the Caddy.
This significant length difference arises because the VW T5 we chose is one size longer than most T5s on the streets. Specifically, it's the "L2" model, which indicates length 2. This same naming system is used for both the Caddy and the Ducato: L1 represents the shortest version, with subsequent lengths being longer. The red mini-camper Caddy in this comparison is the L1 version. It's worth noting that in our previous Ducato Conversion, we also used an L2 vehicle (click).
Our plan is to have a row of three seats behind the driver's cabin (which also has three seats). Behind this seating, we intend to place all our camping equipment, including a permanently extended, fully-ready bed. Let's see if our plans come to fruition and if we can achieve our goal of having a six-seater, fully accessible camper in a regular-sized vehicle.
My Recommendation:
If you're considering building a spacious DIY camper, I would always recommend opting for a base model with Length 2 (L2). The L1 Caddy Mini Camper was a highly ambitious project where every centimeter had to be meticulously planned to ensure a comfortable camper experience in such a compact vehicle. For a detailed building plan complete with step-by-step instructions and pictures, refer to my conversion book (click here).
3. First Look & Measurements
Time to showcase the already impressive interior. Keep in mind, this is the Caravelle version of the VW T5, designed to transport as many people as possible. Therefore, there's even a third seating row in the trunk, making it a 9-seater. We rarely need to transport nine people, and the third row in the trunk occupies valuable space we require for our camper conversion. So, let's remove the third row and reassess the space.
Believe it or not, once the third row of seats is removed, there's almost 200cm of length available behind the second row. The challenge now is to efficiently and swiftly convert this T5 into a fully-equipped camper. As mentioned earlier, the goal of this conversion is to combine a family-friendly daily commuter and camper in one vehicle. With our first child on the way, time is crucial. In search of a quick solution rather than a labor-intensive hands-on approach, I've stumbled upon what feels like the perfect answer.
Before we start the camper conversion, there are some more steps to address. We must ensure the vehicle has a strong, rust-free foundation. A thorough check of every part, both inside and underneath the car, is crucial to spot any needed repairs or maintenance. Stay tuned for the next step.
My Recommendation:
The T5 L2 can seat up to six passengers and still provides generous trunk space for a fully-equipped camper. This includes a bed, drawers, a kitchen, a water system, and more.
4. Inspection & Maintenance
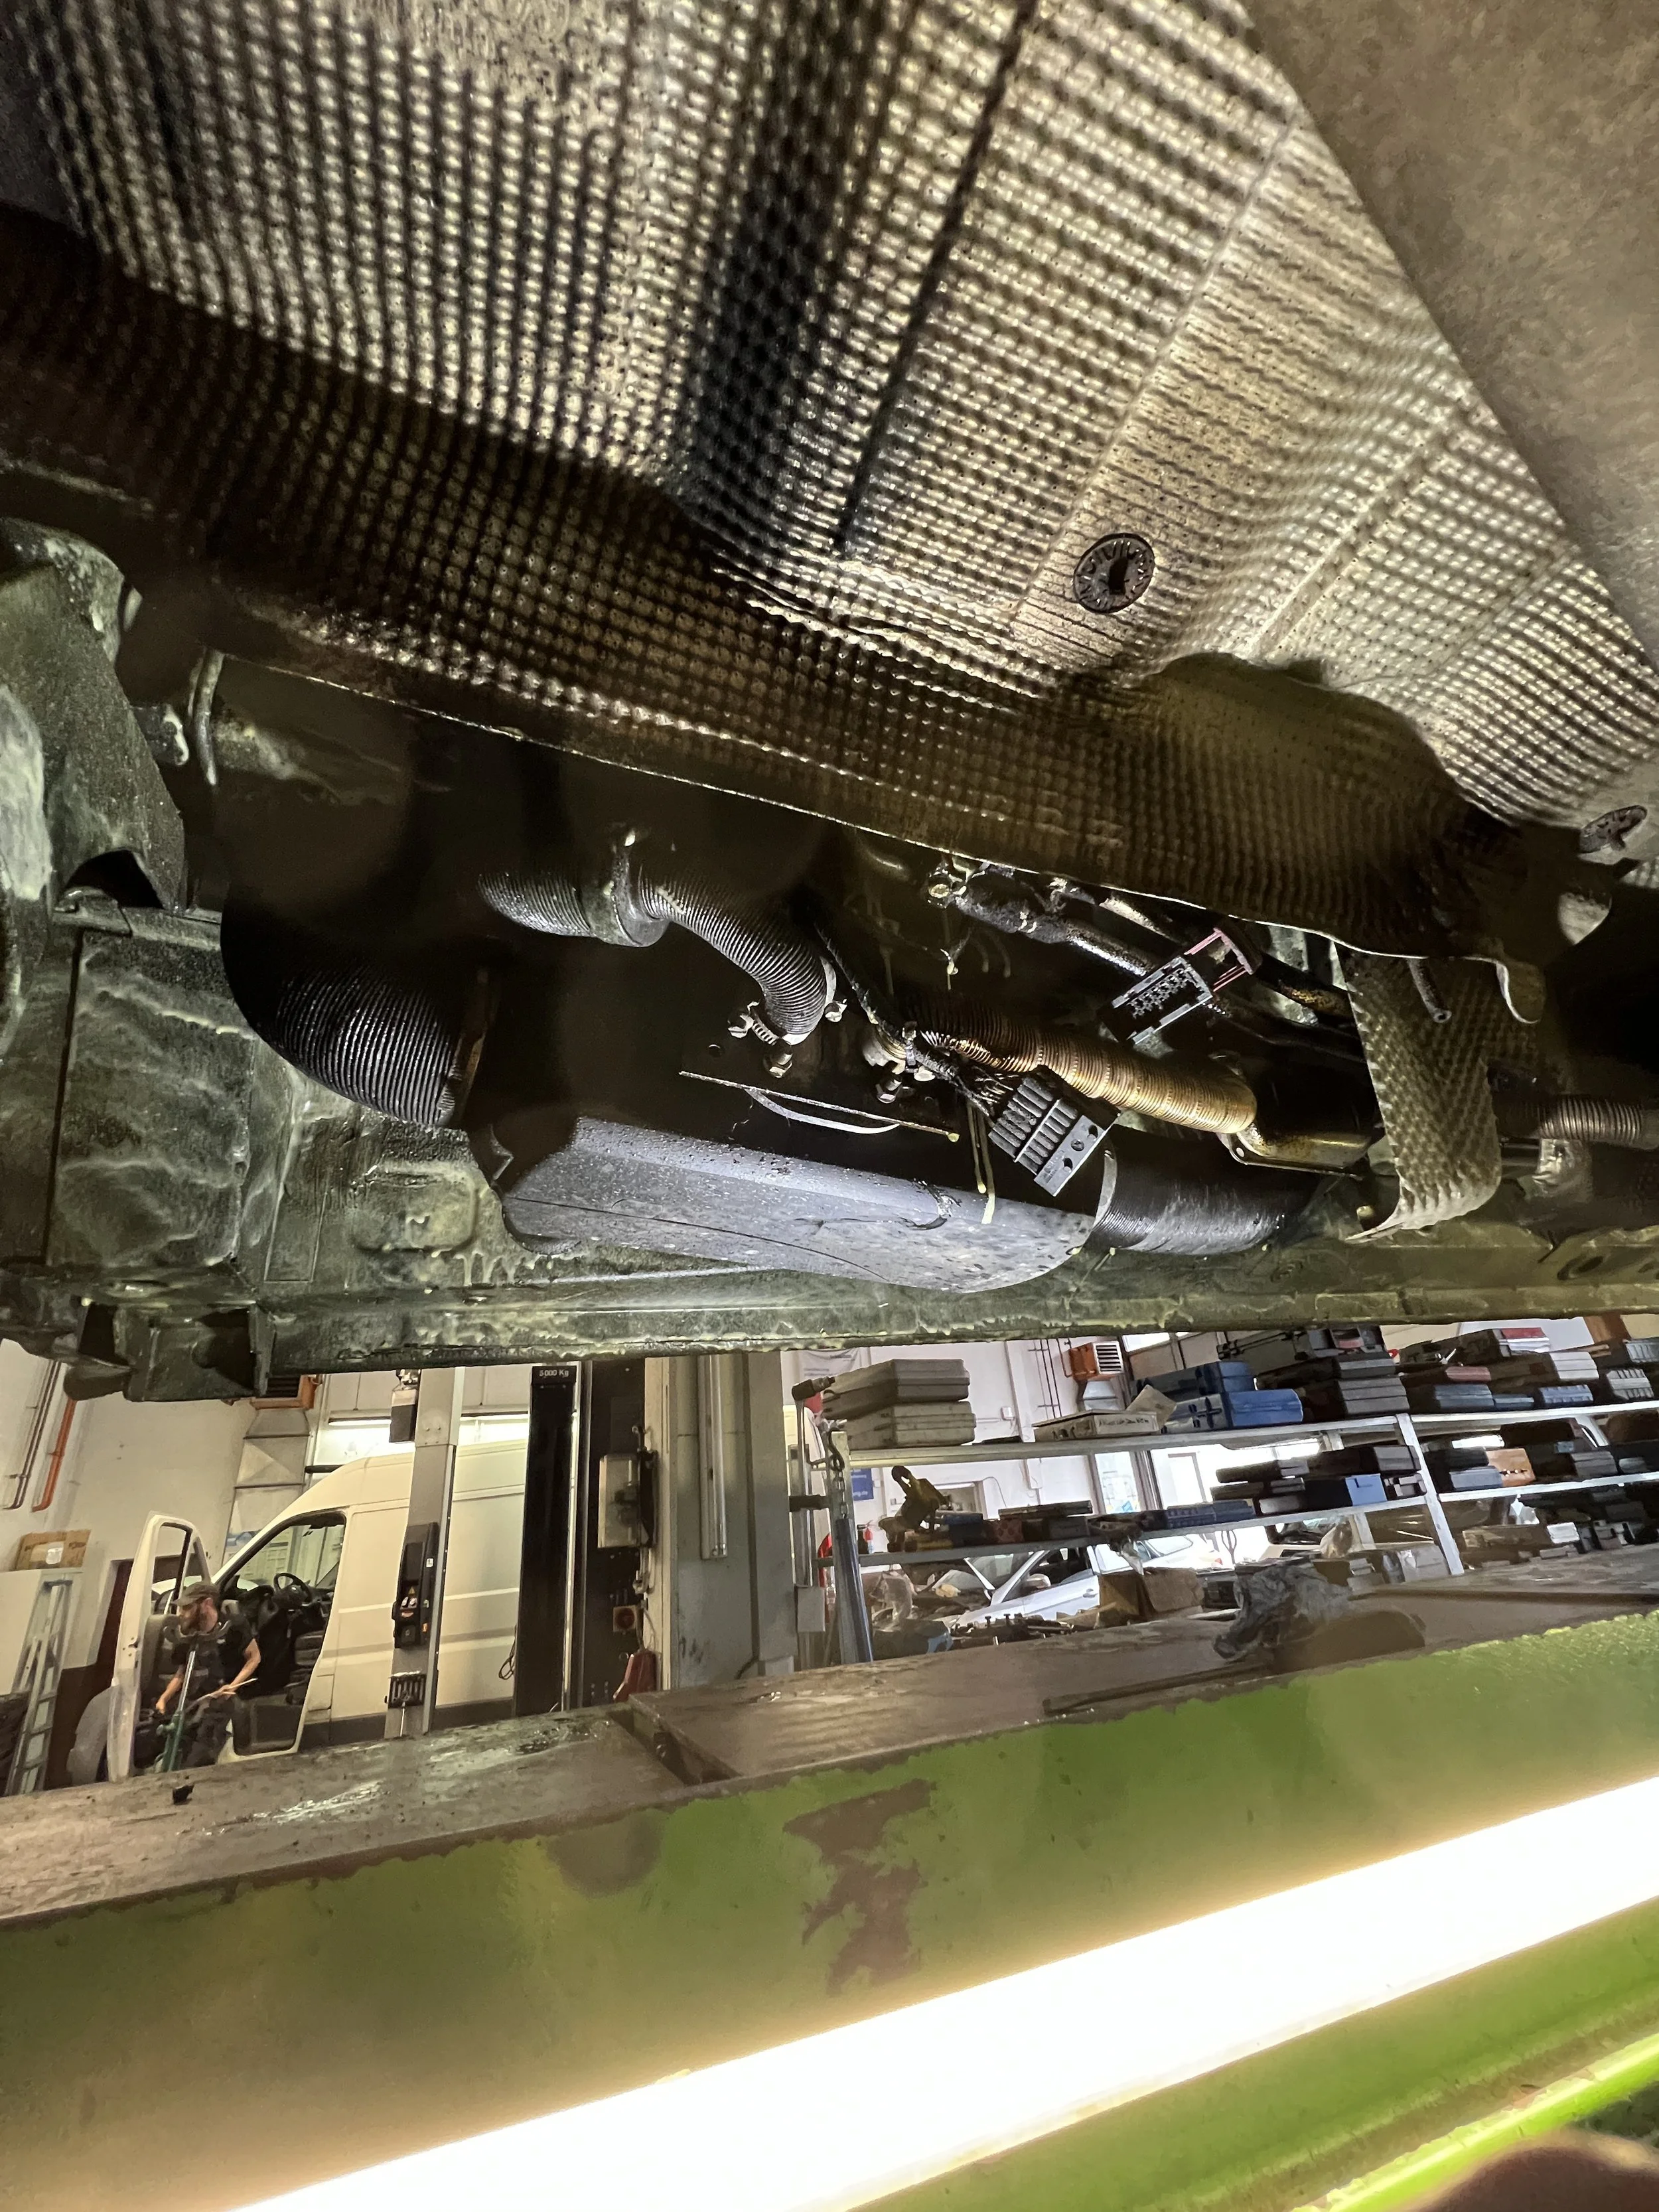
A DIY camper is used not only as a daily commuter but also for experiencing freedom in an exciting and simple manner. Many of us like to travel some distances from home to add more adventure and nuances to our camping trips. Therefore, it's crucial to ensure the vehicle is fully functional to avoid costly road emergencies or even towing services. Let's examine beneath the car to see if there's anything that needs addressing.
I discovered relatively minor issues, such as a worn control arm and a rusty exhaust pipe. These are matters that can be handled within a day. Take a look at the photos, and for more detail, refer to the linked videos at the start of this page.
My Recommendation:
Before beginning your conversion, ensure your base vehicle is thoroughly inspected and well-maintained. It's easier to work on an empty car than to remove an already installed camper interior to address the chassis or handle rust spots. Plus, if you're applying underbody sealer or making holes for a parking heater or the like, it's much more convenient with an empty vehicle.
5. Rust Prevention
Every conversion I do gets a special rust preventive treatment. For me, leaving your valued camper without this treatment is like seeing the time and money you put into the conversion just fade away quickly.
To really slow down the rusting process, which I think is the biggest car enemy, this step is very important!
I looked for the right rust prevention method for almost ten years. Then I found someone who had been searching for the same thing. Many old-timer magazines and owners say his solution works – it's a grease. This grease is sprayed on when it's hot because it melts at a high temperature.
Important: Before you start, thoroughly wash your car!
The only thing you need is an air compressor, everything else you can get from the inventor himself: Mike Sanders. Just go to their website with the same name and you'll find all needed products. Or, you can buy a can of the grease (click), warm it in some water, and use a brush to put it on your car's bottom. Applying it into the hollow parts of your car is also a good idea, known as “cavity sealing”.
Wash Vehicle (cavities & underbody)
Remove all underbody/wheel-housing plastics
Cover floor with protective plastic film
Heat grease (heater included in rental set)
Spray or brush grease onto underbody/into cavities
My Recommendation:
Invest a morning into putting on the grease to protect your camper's value over the coming years. A single rust repair can cost a lot, and you can prevent this by spending one morning putting on some grease. You can see how I apply it in the videos, just browse through my project page, pick any conversion project, and you'll find the grease application in all of them (click).
6. Official Inspection (TÜV Germany)
It was time to take the VW T5 for its official road check-up. In Germany, this check-up is mandatory every 2 years. If you miss it, your car's insurance becomes invalid, and driving a car that doesn't meet public road standards can lead to fines.
Fortunately, the inspection went smoothly, and the official was impressed with the vehicle's condition. Although this T5 was manufactured in 2006 and has clocked 240,000km, its value hasn't diminished significantly. This shows that vehicles kept in good condition don't depreciate as quickly as those that aren't well-maintained.
After the inspection, I updated the vehicle with my number plates and took off the ones from the previous owner.
My Recommendation:
It's crucial to ensure your car is protected against rust and is consistently maintained. This T5, being nearly 20 years old and having covered over 200,000km, is a testament to that. With proper care, even older vehicles can look and run like new.
7. Parking Heater
For me, having a parking heater in every DIY camper is essential. Using fuel from the vehicle's diesel tank, the parking heater ensures that you can embark on travels and adventures throughout the year, not just during the warm months.
This T5 is the first vehicle where I didn't have to handle the installation myself. I typically install the same parking heater, a 2kW diesel model from Autoterm, specifically the “Air 2D” (click). However, in this T5, I discovered a non-functional 4kW Eberspächer parking heater mounted beneath the car (as indicated by the green marking in the attached picture). Lacking the necessary device to diagnose the issue, I quickly took it to a local car electrician. The diagnosis revealed that the mainboard was faulty and required replacement. This situation underscores the benefits of mounting the heater inside the vehicle, which is the recommended approach. External factors like water and humidity can damage the heater's electronics, making externally-mounted heaters more susceptible to premature malfunctions.
My Recommendation:
It's best to position your parking heater inside the vehicle. Even a robust enclosure, such as a stainless-steel box, can't fully shield it from the elements. For a comprehensive step-by-step installation guide, consult my conversion book (click here).
8. Felt Fabric (4Way-Stretch)
One of my go-to materials in camper conversions is felt fabric. It's perfect for quickly covering even the most uneven surfaces. At 3mm thick, it's not only lightweight but also doesn't need any supporting structure. You can simply glue it directly to any surface using spray adhesive. In contrast, wood covers can be bulky, heavy, and much more time-intensive to craft. That's why felt fabric is a top choice for all campers: just a quick spray of glue, attach the fabric, and your interior instantly takes on a warm, homely feel. Plus, it feels cozy when you lean against it.
However, a word of caution: not all felt fabrics are created equal. There are special 4-way stretch versions that can adapt to any shape because they're stretchy in every direction. You can find the link to the specific felt fabric I use by clicking here.
In this project, I used felt fabric for the trunk's plastic cover. I also added two holes and a dimmer for a pair of trunk LED spotlights. This ensures excellent lighting for all the drawers when they're pulled out of the trunk at night. Check out the bottom of this page to see how the felt-covered trunk cover, with its LED spotlights, complements the camper's interior.
My Recommendation:
Using the right felt fabric in camper conversions can quickly upgrade any item. It's a must-have material in all my projects!
9. Camper Insulation
Applying insulation is always a good idea for several reasons. One of its primary benefits is its ability to maintain heat inside the vehicle, keeping the interior slightly cooler and protected from the glaring sun during summer. Additionally, insulation acts as a sound absorber. The minor chassis noises during driving and the sound of closing doors are greatly diminished. Some insulation materials also come with antibacterial and antifungal properties, which can be quite beneficial. Then there are insulations designed to act as a moisture barrier, reducing the risk of condensation due to temperature variations.
I have found an insulation to be particularly effective, which is also known as "Kaimann Technical Insulation" (click).
This insulation includes all the necessary properties for use inside a camper. Moreover, it features a self-adhesive side. Simply peel off the protective film and press the insulation against the desired surfaces. The process is that straightforward! The self-adhesive side is so powerful that just by attaching a small edge, it can support a large piece of insulation on the car chassis (see photos)!
You can also attach the insulation to the reverse side of your plastic panels; this method is also good (see pictures).
The insulation sheets are available in various thicknesses and are provided on a 2m wide roll. Given its easy-to-cut nature, you can swiftly customize it to fit all surfaces inside your vehicle. For a detailed guide on its application, you can refer to my "How to Build a Mini-Camper" conversion book (click here).
My Recommendation:
Best to choose a self-adhesive insulation with antifungal properties that is flame-resistant and serves as a moisture barrier. Such insulation will significantly improve both camping and driving comfort. It's an essential addition, especially for those living in areas with changing seasons. Here in Europe, I wouldn't advise anyone to build a camper without adequate insulation. It diminishes the camper's usability, especially in the winter. Moreover, resting in the car under the intense sun during summer becomes much more tolerable with proper insulation.
10. All-In-One Electro Solution (Electro Innovation)
In all my previous camper conversions, I found myself deeply immersed in electrical research, often for weeks, to ensure a safe and fully functional camper electrical setup. This was particularly true for the Fiat Ducato conversion (click) and the VW Caddy conversion (click). Without significant and prolonged research, it's nearly impossible to establish camper electrics that cover everything, from 230V systems to solar setups. Admittedly, many of us just don't have the time to spend on the electrical component alone.
Thankfully, recent innovations have introduced a solution: the portable all-in-one camper electrical device, the Accubox from Ective (click).
This device truly does it all. It comes with a lithium battery, 230V generator, and various charging sockets from USB to USB-C, among others. Additionally, it has an integrated solar charger, which means if you opt for a solar panel or a solar bag, you just plug it into the box. It features Bluetooth monitoring and can even jump-start your camper or car if the engine battery runs out. What's more, it's portable. Just use the carry recesses and take it wherever you go, be it a campfire or an outdoor party. Its applications seem limitless. In simple terms: buy this, and your camper's electrical system is ready to go, with no feature left desired.
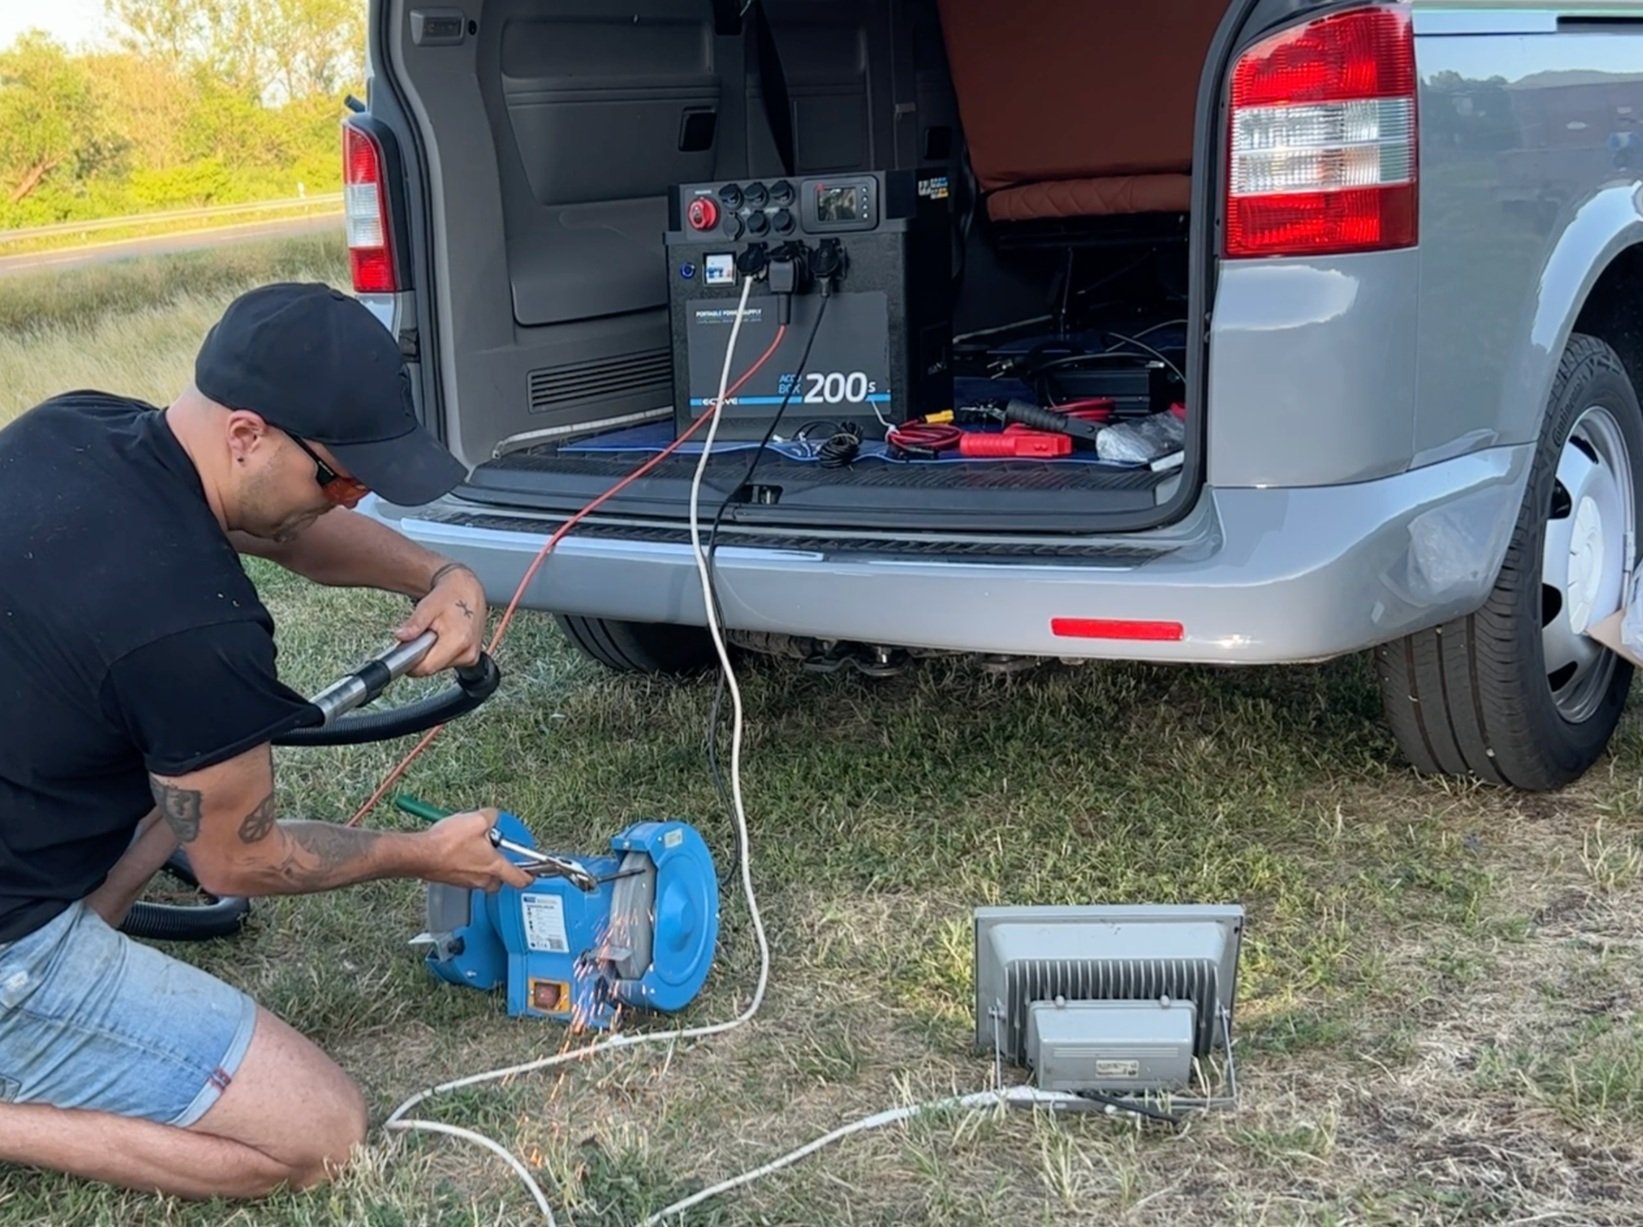
I had to get one for myself. It fits perfectly under the bed, and I'm genuinely satisfied. Should I decide to switch vehicles in the future, I can easily transfer it. It's so efficient that it might make installing separate electrical devices obsolete. I couldn't help but test it, so I plugged in a 230V grinding machine, a vacuum cleaner, and a large spotlight into the device. It powered all three simultaneously without any effort. Incredible! (see pictures). You can find the detailed installation in the VW T5 conversion video. Additionally, you can see the Accubox powering the kitchen setup in the camping box installation video (click here).
My Recommendation:
Bypass the lengthy electrical studies. Instead, invest in a single device that manages everything. The Accubox is a notable innovation for those looking for an uncomplicated solution for their camper electrics, whether due to a lack of electrical expertise or simply a shortage of time. For a detailed chapter on this device, refer to my camper conversion book (click here).
11. Oil & Oil Filter Change
To ensure the longevity of your cherished camper, we've already taken a significant step that distinguishes you from many camper and vehicle owners: the rust prevention treatment detailed in step 5. However, there's another simple task that targets the car not externally, but internally, within the engine: outdated oil and a clogged filter. During combustion and operation, tiny particles form in the oil circulating your engine. Over time, the protective function of your oil and filter diminishes, necessitating the replacement of both.
Given that this task requires frequent attention, I recommend attempting it yourself, which could result in considerable long-term savings. When you get your vehicle's oil and filter replaced at a workshop, the bulk of the expense isn't for the oil or filter but the service fee charged by the workshop.
You could simply ask a local mechanic if you could assist in the next oil and filter change to learn the process. Alternatively, check out my upcoming T5 conversion video or the VW Caddy Maintenance video (click) I've made to guide you.
You'll likely be surprised by how straightforward it is to change your oil and filter. Be brave and try it yourself, or ask for help of a knowledgeable family member or friend for your first couple of attempts.
My Recommendation:
Handling the oil and filter change on your own can lead to significant savings over time. Moreover, since many machines operate similarly and have both oil and an oil filter, you'll be equipped to service other equipment as well. Don't forget to watch the maintenance video I've prepared for you (click here).
12. Installing a Rear Camera
The larger your vehicle, the more crucial it becomes to have a clear view of your surroundings. While the front and sides are generally well-covered by standard mirrors and the driver's cabin view, one area remains largely unseen: the rear.
Thus, a rear camera is a recommended addition to prevent unintentional collisions. You might be thinking of the potential cost, especially if it wasn't initially included in your conversion budget. Plus, the thought of doing the installation yourself might seem daunting, given the perceived complexity and electrical knowledge needed. But fret not! I have a cost-effective solution that even those without any prior knowledge can handle.
Like many of us, I'm not an electrician and had never installed a rear camera before. Manufacturers recognize this gap, and to cater to a broader audience, they've simplified the installation process. Here's a breakdown of how straightforward it has become:
The camera monitor comes with its mount. All you need to do is plug it into the standard 12V cigarette lighter socket in the driver's cabin. This device usually has an on/off switch, which you can press to decide its duration of operation.
The rear camera also has its mount. Just peel off the protective film, attach it to your desired location on the trunk, and thread the cable through a hole in your trunk. The only tricky part is routing this cable all the way to the monitor at the front. Once connected, you're all set!
But there's an even simpler solution: The Wireless Rear Camera!
This version eliminates the need to route a cable from the rear to the front. The rear camera comes with a built-in battery, making the installation as easy as:
Plugging the camera monitor into the 12V cigarette lighter socket in the driver's cabin.
Affixing the camera to the rear or top of your vehicle. That's it!
For a comprehensive guide on camera installation, I've dedicated several chapters in my conversion book specifically for this purpose (find my camper conversion book here).
My Recommendation:
Don't be intimidated by the prospect of installing a rear camera. My conversion book (click) offers solutions and guidance, empowering you to handle the task yourself. Plus, many of these camera systems are priced below €100. In short: achieve rear visibility without the need for a workshop visit or hefty installation fees!
13. Camper in a Box: The Conversion Kit Arrived
As we expect our firstborn soon, I had to find a solution that allowed a very fast conversion. The electro installation was basically a single purchase, see step 10 “The Accubox” (click). But now we need a camper interior, so I made it my quest to find the quickest solution possible.
My first thoughts were a simpler conversion without elaborate installations, but then I came across a company in Slovenia that sends out cartons containing entire conversion kits for many car models. And the VW T5 was one of the options. When I dived deeper into their camping boxes, I discovered that they truly feature everything I would have installed myself, from a kitchen, to slidable drawers, a refrigerator and even a water system including a water pump and a bed to sleep on. The purchase was made within minutes and not long after a single carton arrived… and undoubtedly it was the biggest carton I have ever received.
Time to unpack and see what's inside the carton. As the known saying goes: “A picture says more than a thousand words,” so have a look at the attached pictures before we dive deeper into the installation and if I was happy with the quality and functionality of the camping box.
My Recommendation:
If you have only a short time to complete your conversion or simply lack a workspace and tools, there are plug & play camper conversion kits available. One that stands out for its price-value ratio is from the Slovenian company “Flip”. The installation we tackle in the next step, or skip the reading and have a look at the camping box installation video I made for you (click here). For those desiring a hands-on approach but lacking workspace, I've included a chapter in my conversion book (click) detailing how to find a suitable space for a camper conversion.
14. Presenting the Camping Box
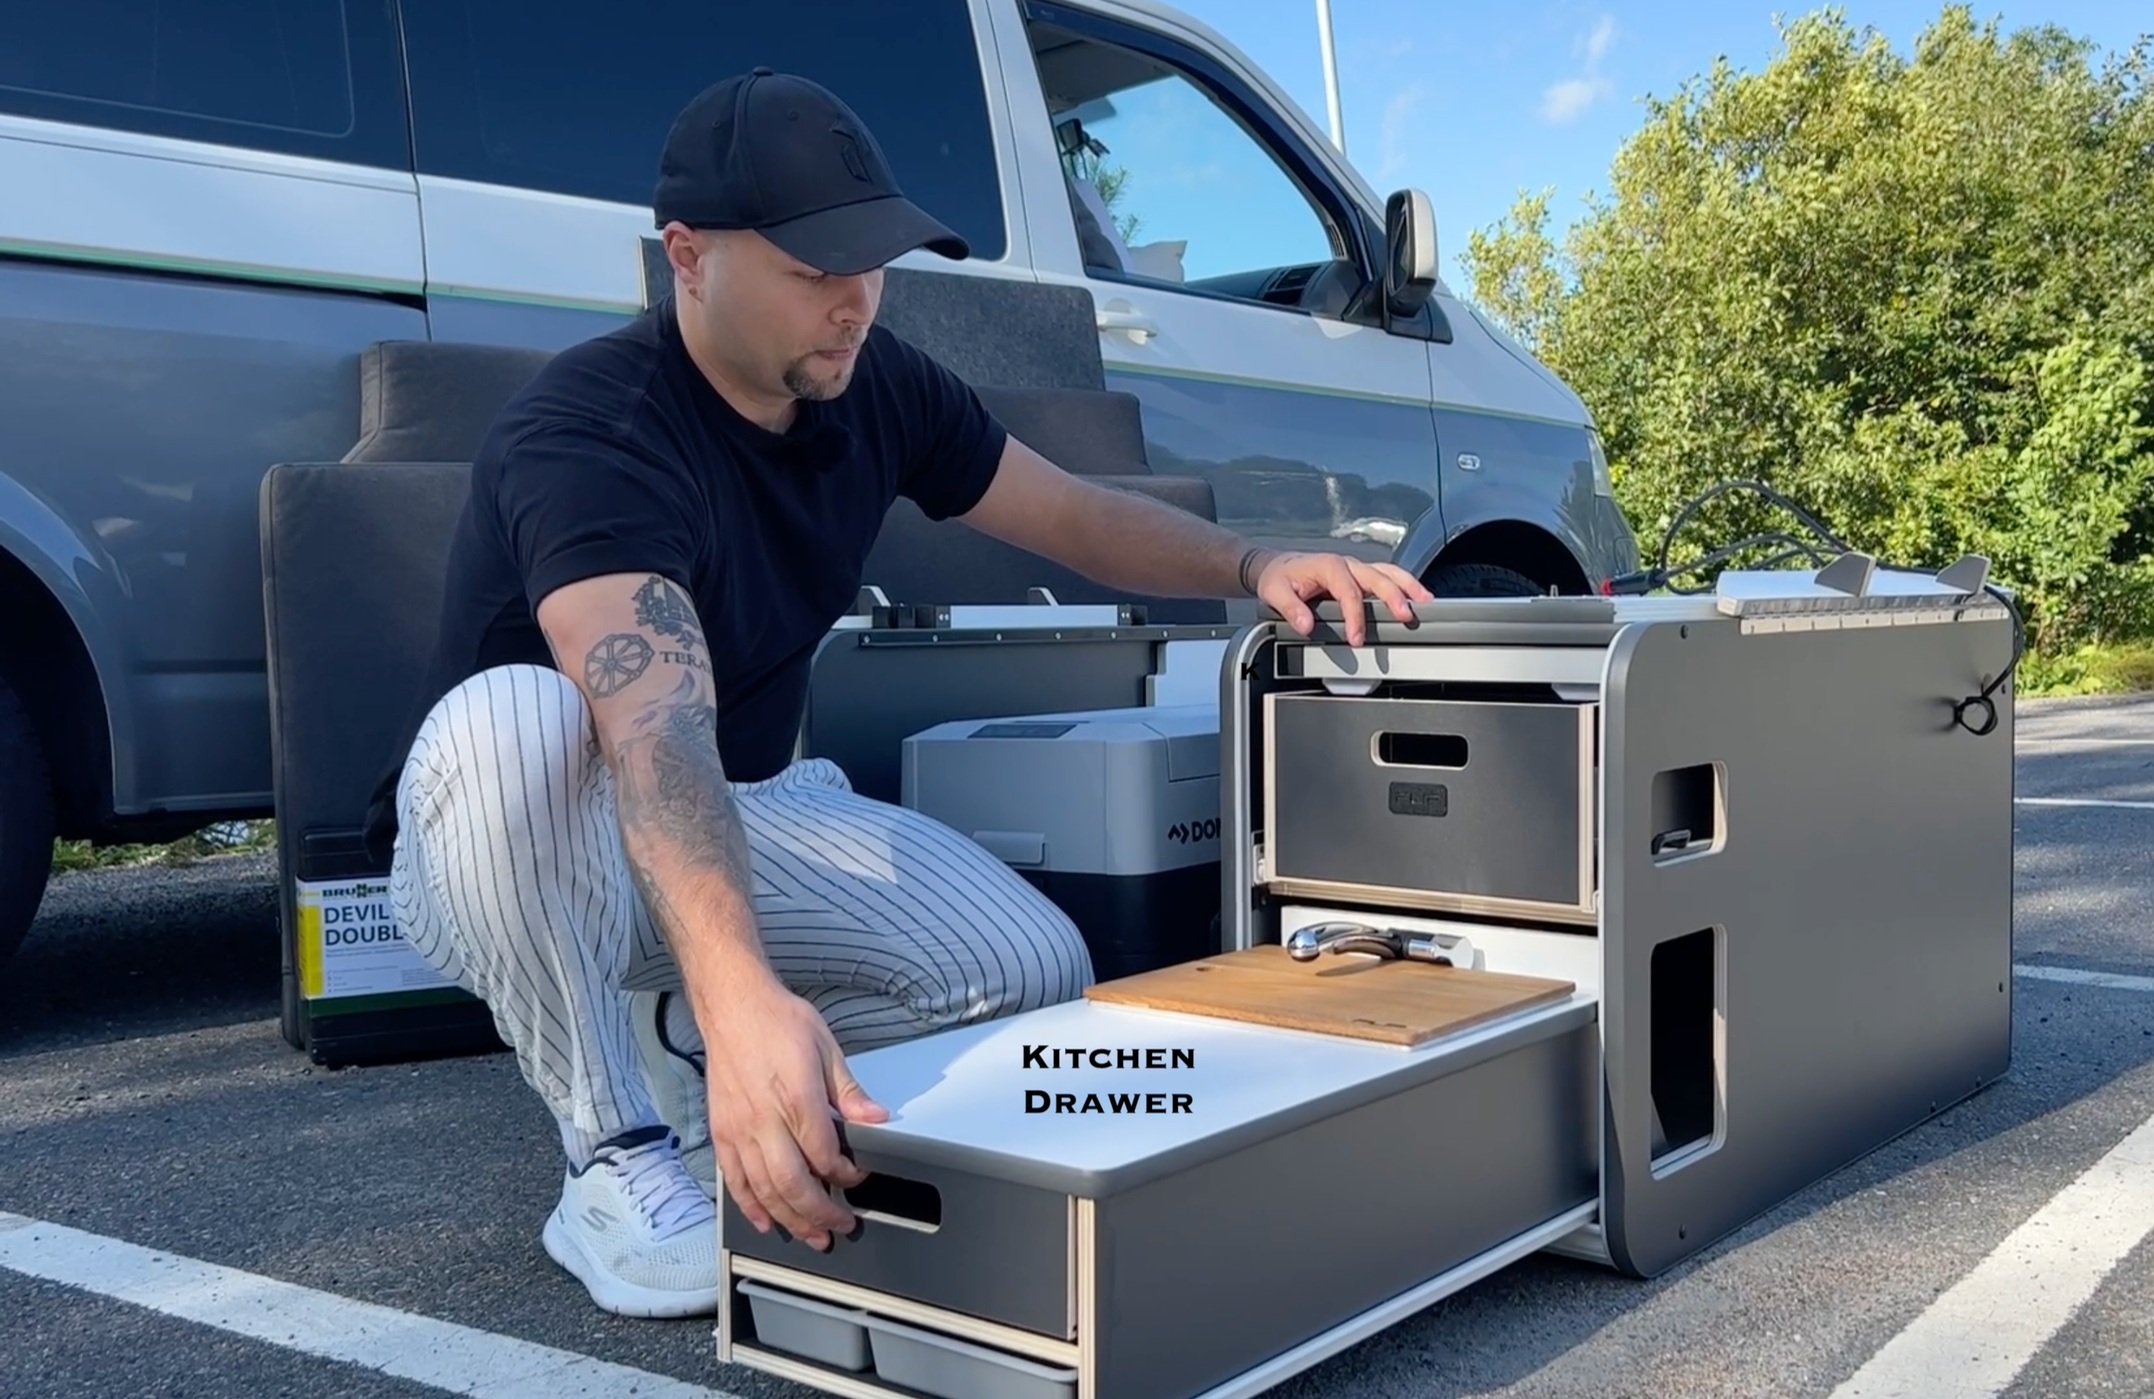
I eagerly anticipated whether the purchase would prove its worth, and if I might come to regret not crafting the camper interior on my own. I carefully laid out all the components around the car for an initial inspection, pulling the drawers in and out, and thoroughly examining the entire kit.
To my delight, I was pleasantly surprised. The entire kit is robust and of high quality. Everything operates as it should. Up to this point, I had no complaints, but the real test would be fitting it into the car and examining all its functionalities, including the water system.
The kit mainly consists of two parts: a left and a right module. A platform in the middle, designed for the 12V refrigerator, connects both modules, forming a stable structure. They've incorporated locks at various points that latch onto each other, enhancing its solidity. Both modules have attachment points for the provided straps, allowing you to secure the module to the cargo strap points inside your vehicle. This boosts its stability, especially during sudden stops or in the unfortunate event of an accident.
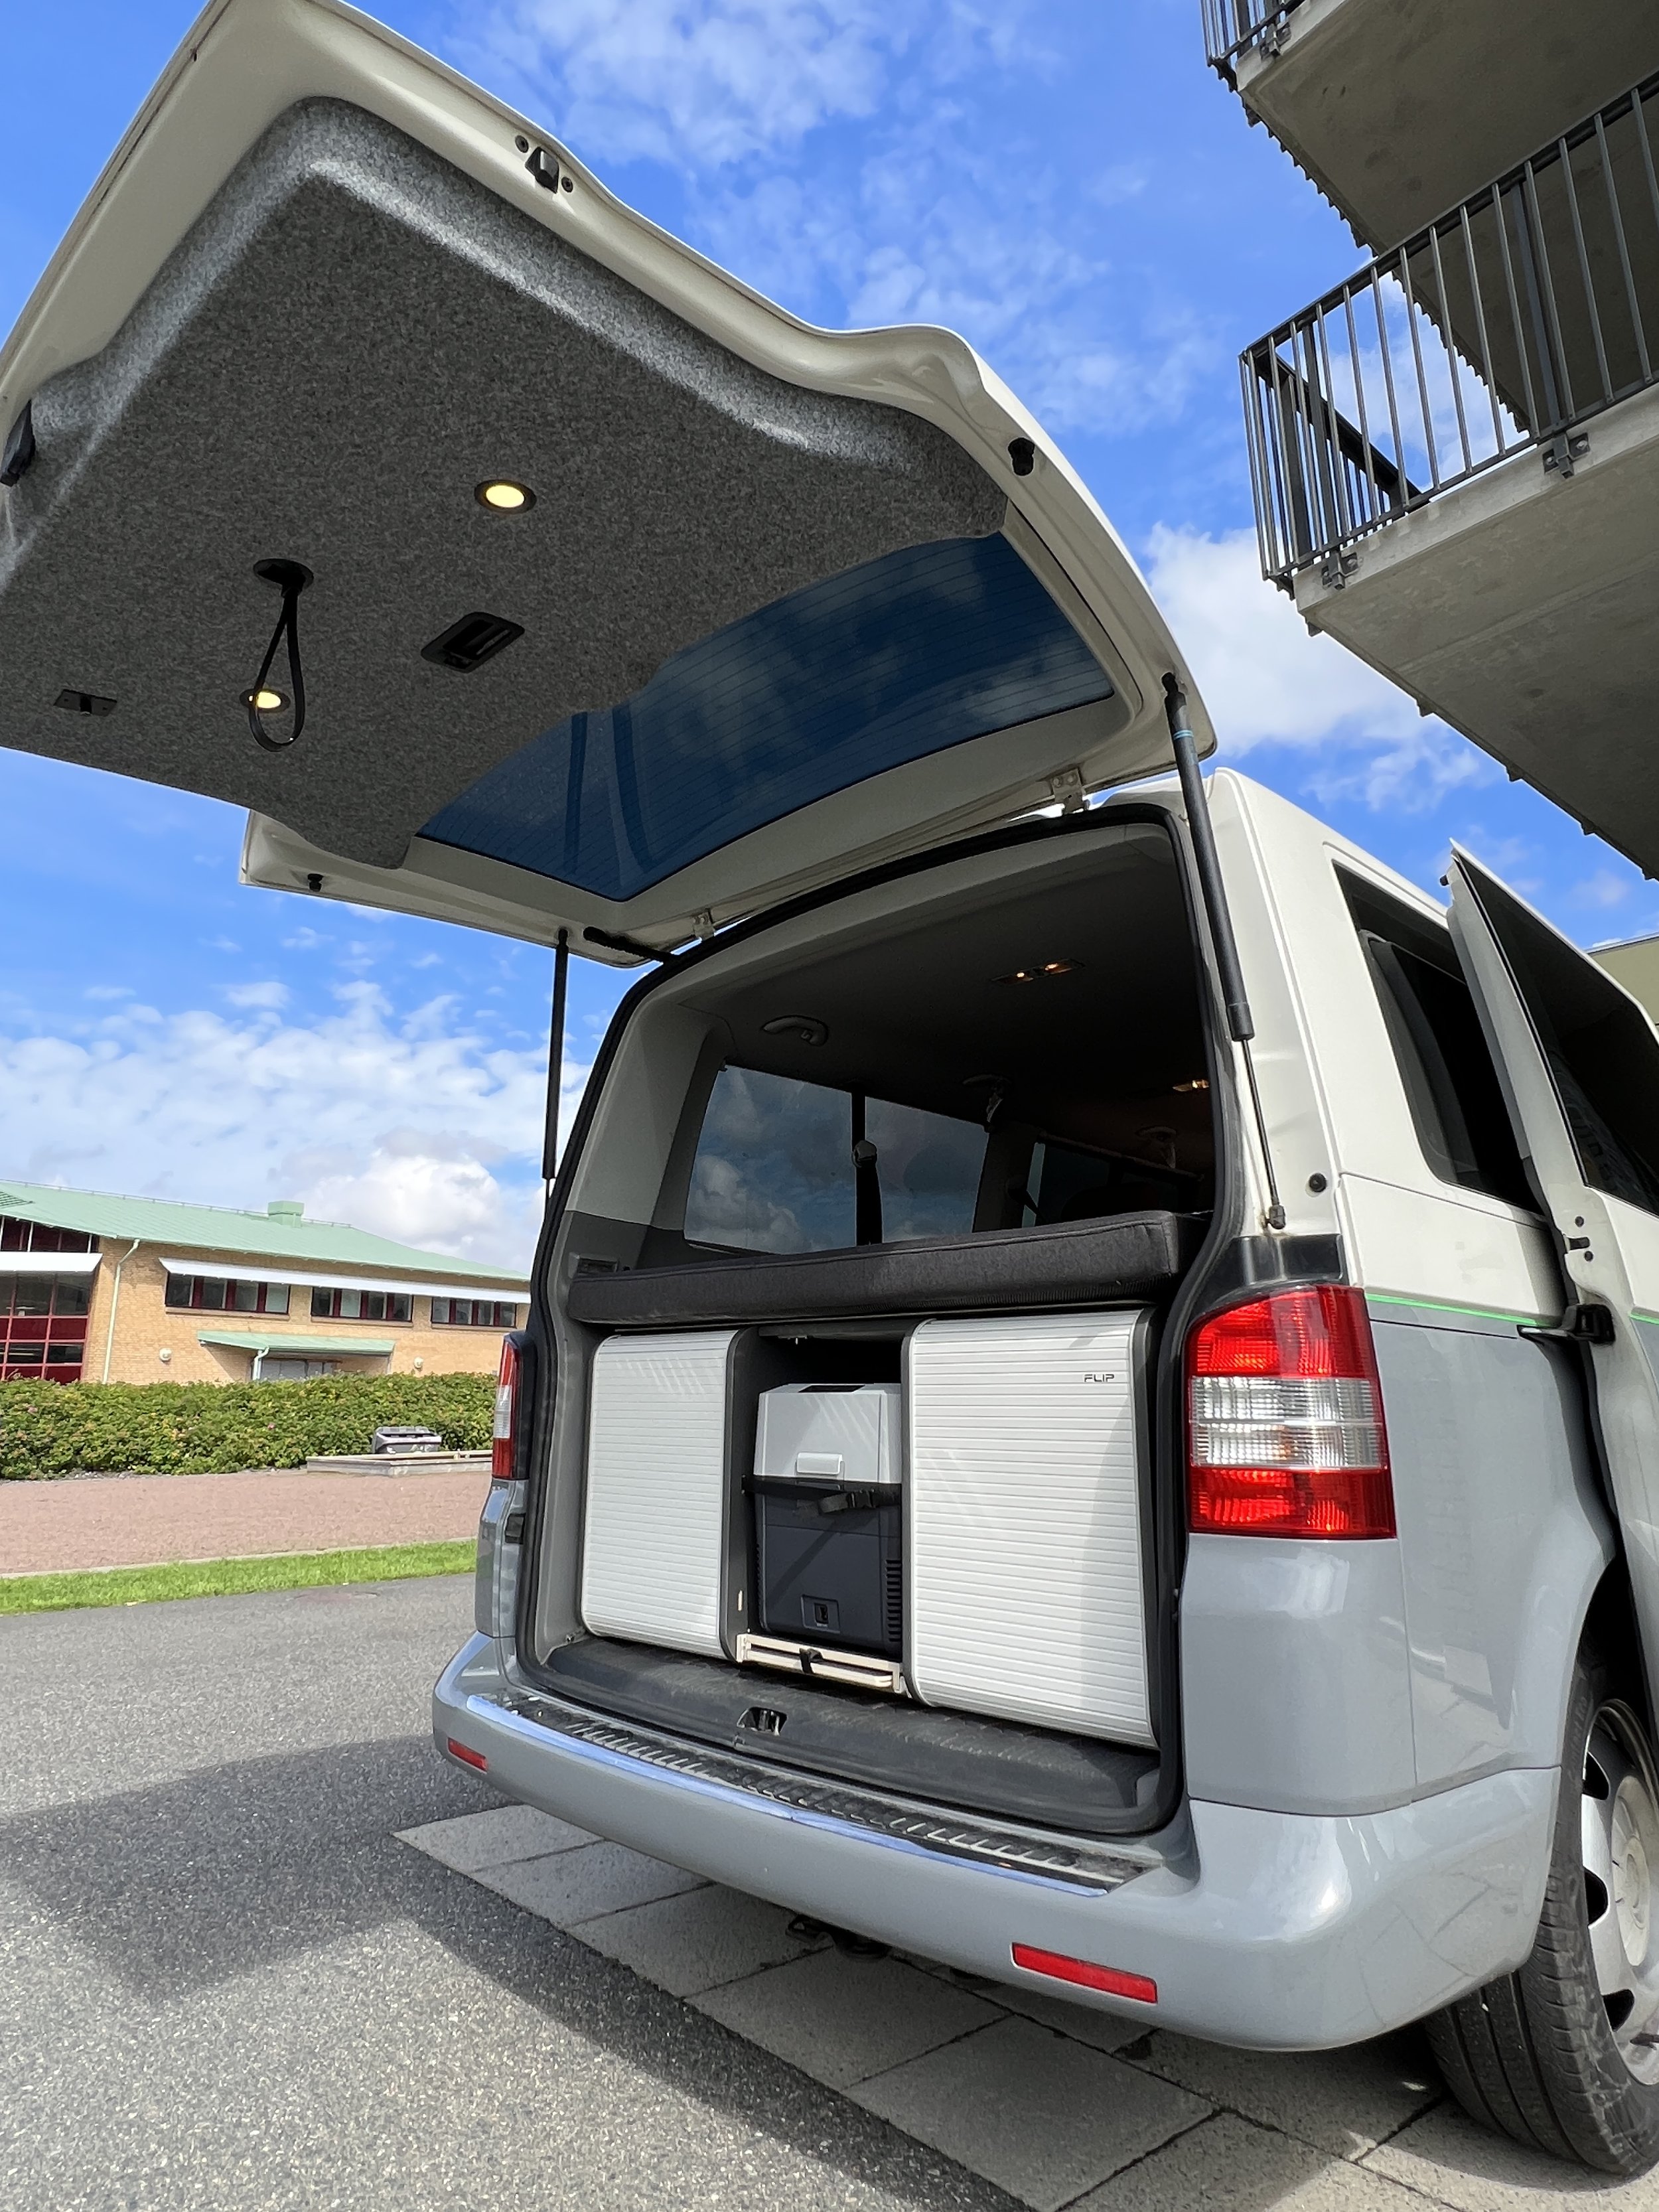
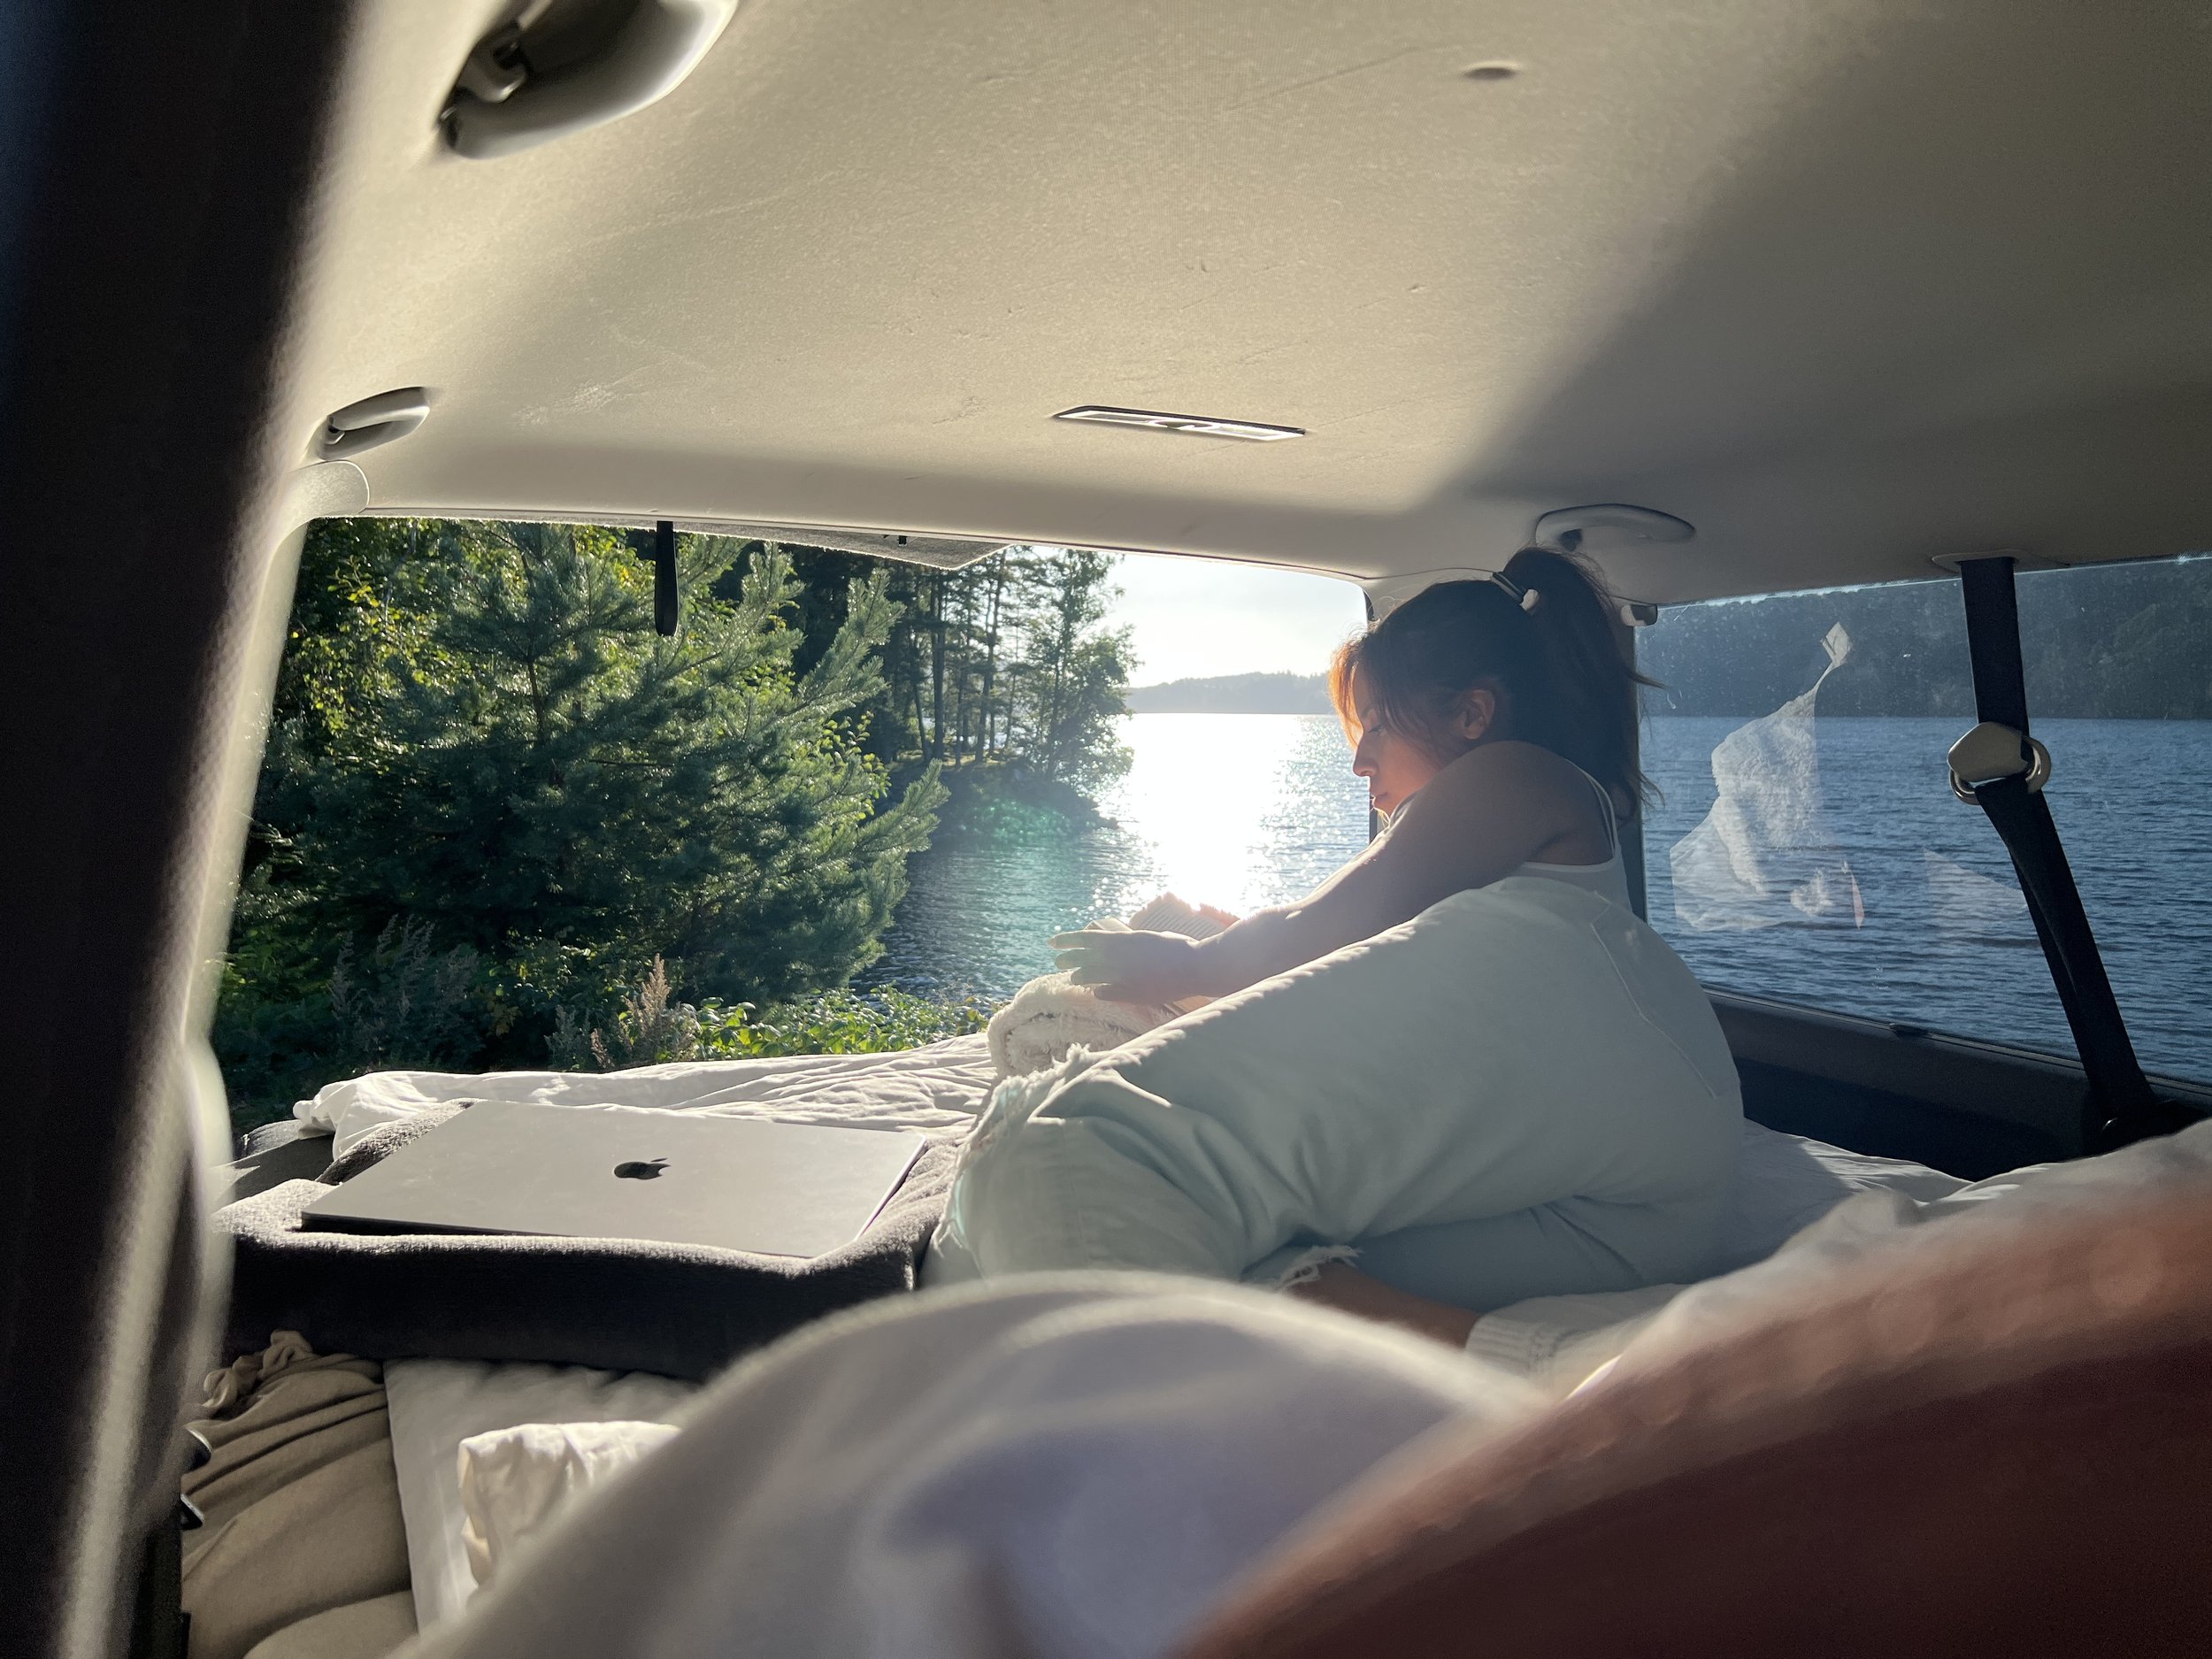
Inside the two modules is a hidden aluminium structure that can be pulled out of the back, allowing it to fit a variety of car trunk sizes. In a very small car, you can simply fold the second chair row flat, and the aluminium rail could extend until full extension is reached. In slightly bigger cars like this T5 (l2), the module can be extended to around 190cm permanently, allowing us to simply jump into bed whenever we get tired during a long drive or on a spontaneous weekend trip.
My Recommendation:
The extendability of the integrated aluminium structure allows this camping box to be adjusted to many different trunk designs. If your car is very small, you might be able to fold a seat row and extend the aluminium structure above the folded seats to create a truly lengthy and comfortable bed.
15. Camping Box Mounted + Installation Video
The camping box comes with an integrated 12V cord for the water pump, which I can now effortlessly connect to the all-in-one electro device from step 10 (click).
The modular system of this camping box allows for easy mounting and removal without any assistance. Each part can be easily lifted and placed inside the vehicle. A stable platform is also included for beneath the modules, useful in case the flooring of your trunk isn't perfectly even. And in just minutes, I had a fully functional camper!
With the unit now installed inside the VW T5, I genuinely have no complaints. For a one-carton delivery, I received everything I desired, and the quality is absolutely commendable for its price.
For a detailed installation guide, check out the “Camping Box Installation Video” (click).
My Recommendation:
For those seeking an immediate camper transformation straight out of a box, the Slovenian company “Flip” has the perfect solution. Here's a link to their website (click).
16. Final Results: The Instant Camper
Even as a DIY camper builder at heart, I have to admit… the camping box might be the solution some of us were searching for.
Some of us are too busy for a conversion…
Some have no workshop for a conversion…
And some simply seek a quick solution that can be lifted into the car for spontaneous weekend trips…
Then, paired with the all-in-one electrical unit (click), which provides all the electrical ins and outs a camper could wish for in a single device… this T5 truly has it all, straight out of the box, literally.
Such a convenient approach was unheard of a few years ago, and I genuinely appreciate the recent innovations in the camper world. These advancements enable many of us to realize our camper dreams without the need for extensive camper building and electrical installation knowledge.
In Summary:
There's no need to own both a large camper and a regular car when you can simply combine them, saving a significant amount of money and enjoying spontaneous road trips whenever the mood strikes.


